Metal Roofing Alliance Member
TVA Preferred Partners Network
Music City Specialists
Nashville, TN
Licensed & Insured
BBB A+
.avif)
Call Anytime
(615) 649-5002Start Designing
YOUR NEW ROOF
YOUR NEW ROOF
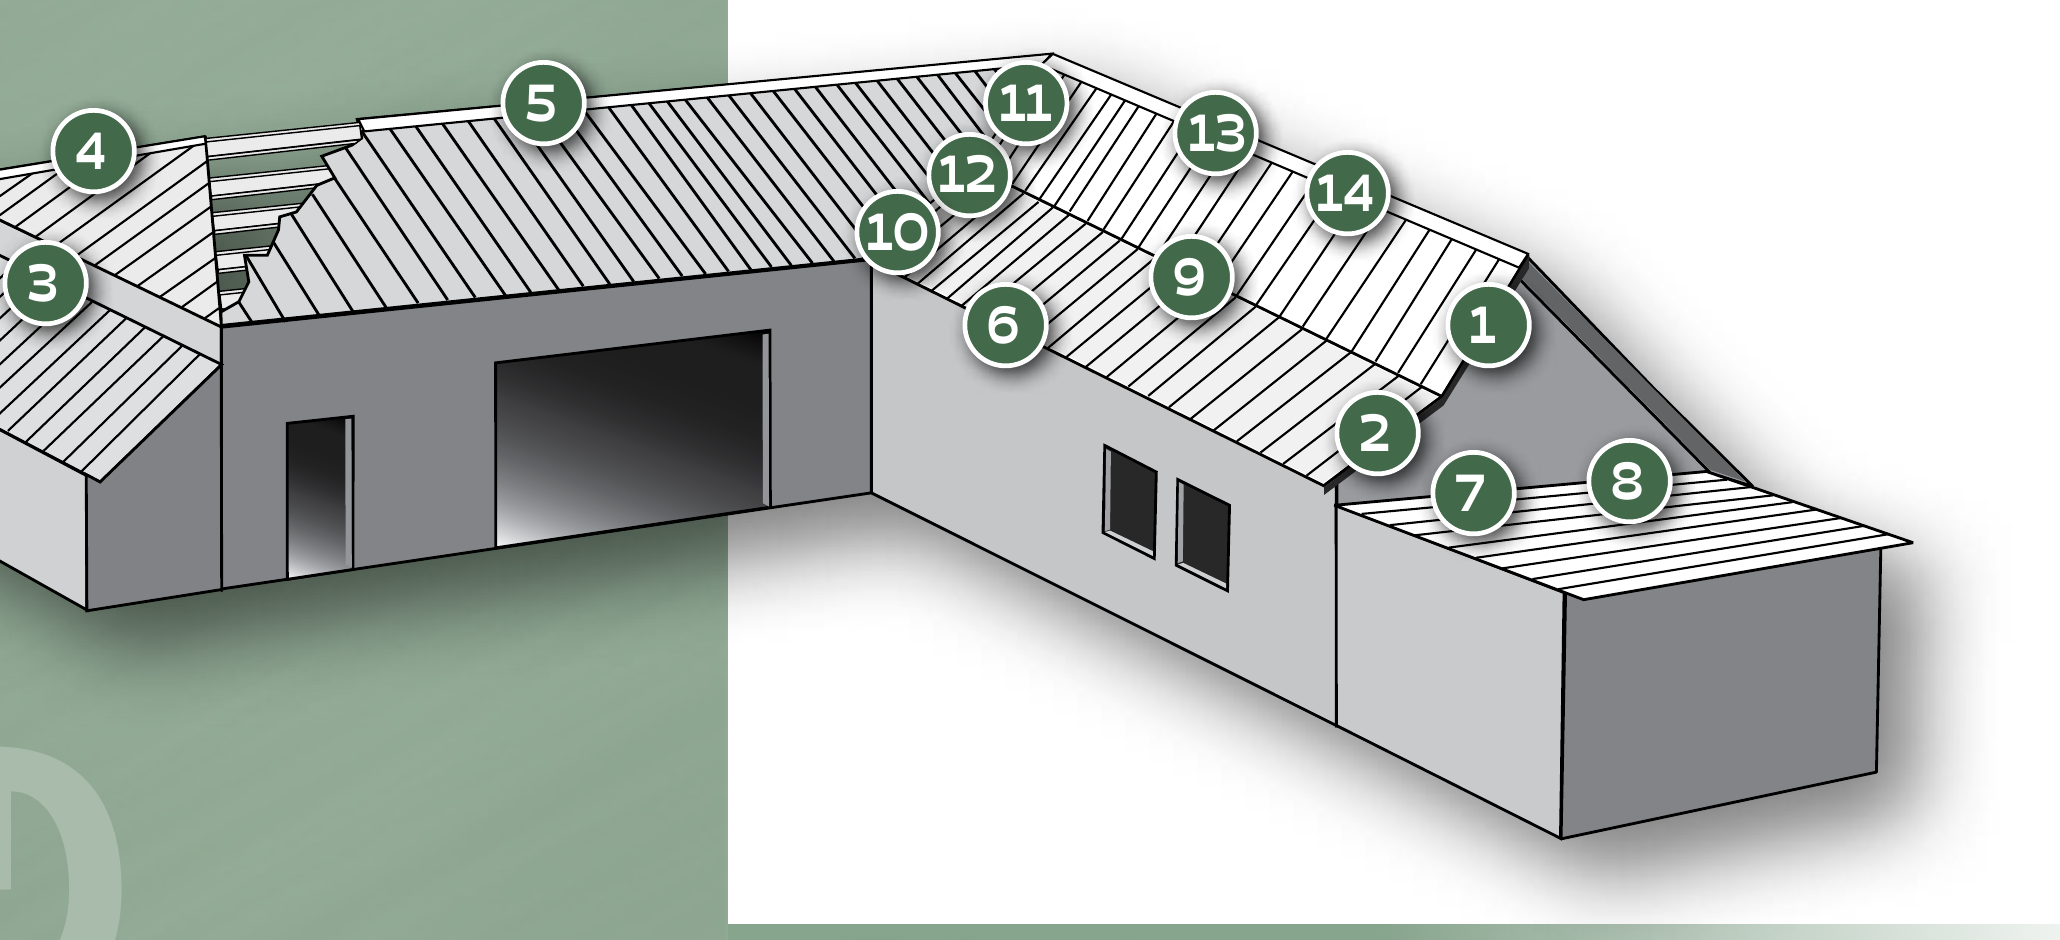
Field Guide · Standing Seam & Exposed Fastener
Every piece of metal trim on a roof exists to do one job at one junction. This guide walks through the standing seam and exposed-fastener trim sets we form and install across Middle Tennessee, with a plain explanation of what each piece is, where it sits, and why it is there.
A flat panel sheds water on its own. The roof gets tested where the panel stops or turns: the rake and eave edges, the ridge and hips, the valleys, the walls it runs into, and the holes cut for pipes, chimneys, and doors.
Those junctions are what the trims and flashings on this page are for. Each one carries water across a specific joint, closes a specific opening, or holds a specific edge down without putting a fastener in the weather. Get the detail right and the roof stays dry for decades. Rush it and no sealant saves it for long.
A few terms repeat across every profile below. They are worth knowing before you read the pieces.
A folded-back edge. It stiffens thin metal and forms a clean drip line so water releases instead of curling back underneath. An open hem leaves a small gap; a closed hem is folded flat.
A concealed strip that hooks an edge and fastens to the deck. It holds trim and panel edges down with no screw through the visible face, so the weather surface stays solid.
A shaped filler that plugs the open ends of a ribbed or seamed panel. It keeps wind, rain, and pests out of the rib cavities. Vented closures do the same while letting attic air pass.
Shaped metal that weaves the roof into a wall, valley, chimney, or opening. It carries water across the junction instead of letting it run in.
The face that shows to the weather. Profiles are marked so they are formed and installed with the finished side out.
Some trims are bent to the actual roof, so the angle, height, width, or length is set per job rather than stocked. That is why several profiles below say specify.
Standing seam hides its fasteners under concealed clips and folded seams. Exposed fastener, or classic panel, screws through the face. The trims do the same jobs, shaped to each system.
Choosing a System
Both are real metal roofs and both are trimmed to shed water at every junction. The difference is how the panels are fastened, which drives the look, the cost, and the upkeep.
| Feature | Standing Seam | Exposed Fastener |
|---|---|---|
| Fasteners | Hidden under concealed clips and folded seams | Driven through the panel face with gasketed screws |
| Look | Clean, architectural raised seams | Classic ribbed panel, more utilitarian |
| Best for | Homes, architectural projects, low-slope and premium re-roofs | Barns, shops, agricultural buildings, and budget-minded roofs |
| Slope range | Works down to low slopes, especially with mechanical seams | Best on standard pitched roofs |
| Up-front cost | Higher material and labor | Lower up-front cost |
| Maintenance | Minimal, with no face fasteners to service | Periodic screw and washer checks |
| Panel movement | Floats on concealed clips as it heats and cools | Held by fixed face screws, less free to move |
| Trim and color | Formed from matching coil, color matched to the panel | Formed from matching coil, color matched to the panel |
Materials, Gauge & Finish
Trim and flashing are formed from the same painted metal coil as the panels they finish, so color, gauge, and finish match and weather together. Here is what that coil is, and how the choice is made.
The standard substrate, a Galvalume or galvanized steel coil with a baked-on paint finish. It balances strength, cost, and corrosion resistance for most Tennessee roofs.
Naturally corrosion resistant and a good choice in coastal or high-salt settings. It is lighter than steel and will not rust, at a higher material cost.
A premium metal used for accents and specialty work. It needs no paint and weathers to a natural patina over time.
Gauge is the thickness of the metal, and a lower number is thicker. We run 26-gauge as the residential standard and offer 24-gauge as a heavier upgrade for larger panels, higher exposure, or commercial work.
PVDF, sold as Kynar 500 or Hylar 5000, is the premium finish that resists fading and chalking for decades. SMP is a more economical paint with a shorter color life.
Trim is cut from the same coil and color as the panel, with the painted side installed out, so ridges, edges, and walls read as one roof rather than a patchwork.
System One · Concealed Fastener
Standing seam hides its fasteners under concealed clips and folded seams, so the trims are built around seams, clips, panel movement, and clean edges. It is the system most homeowners picture when they think of an architectural metal roof.
The visible perimeter and peak, where the panels stop and the roofline is read from the street.
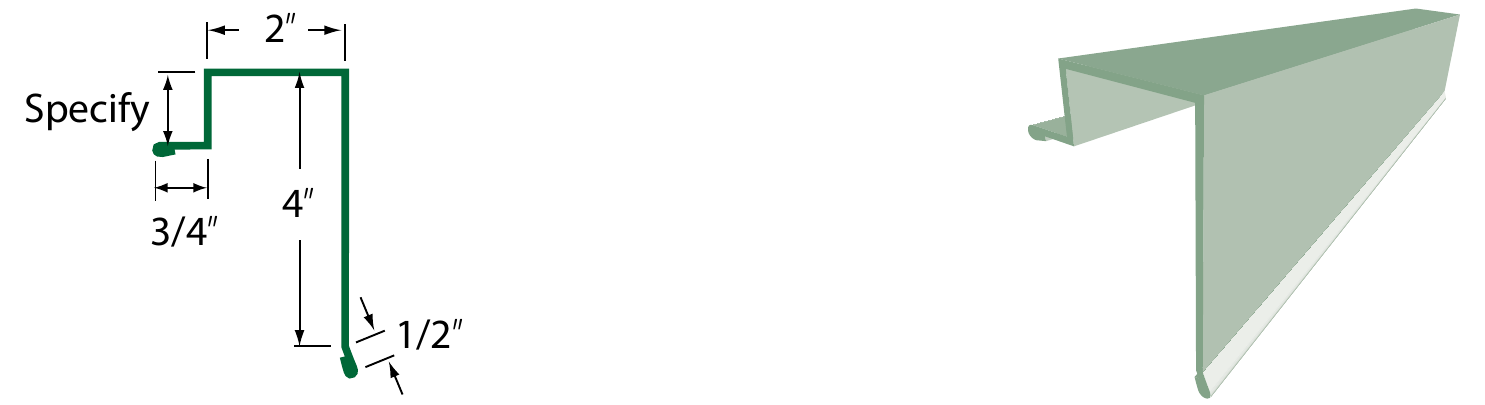
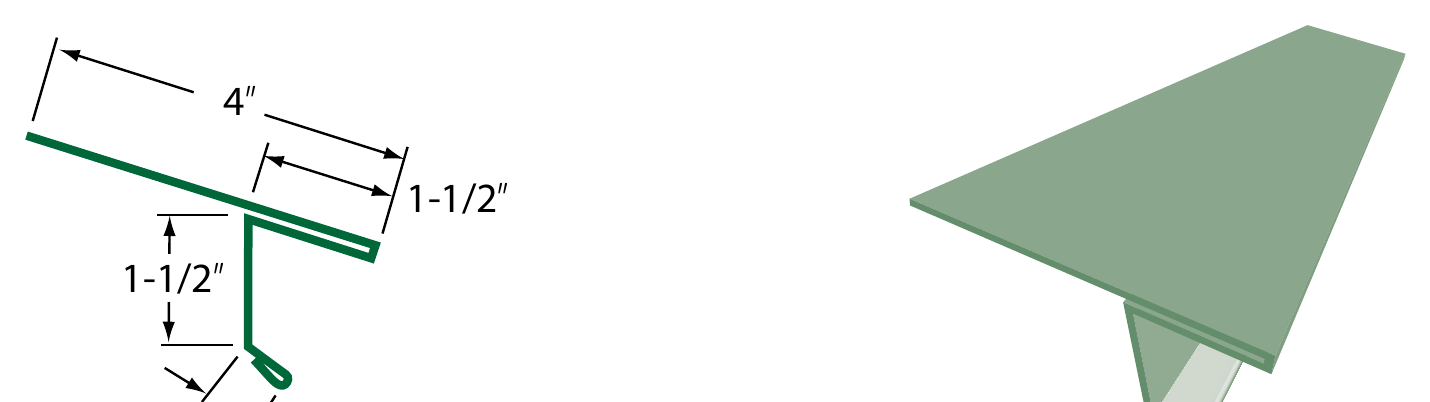
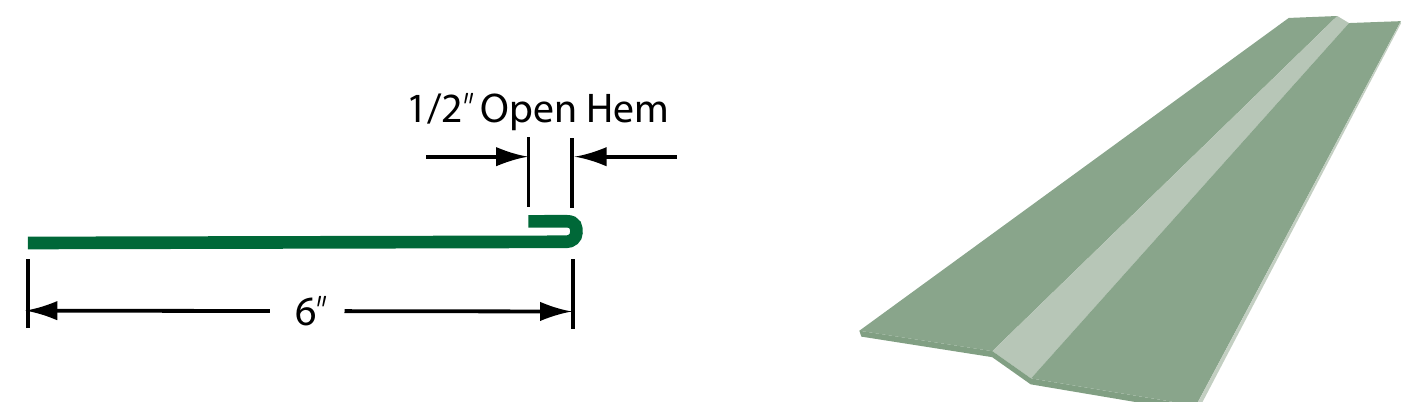
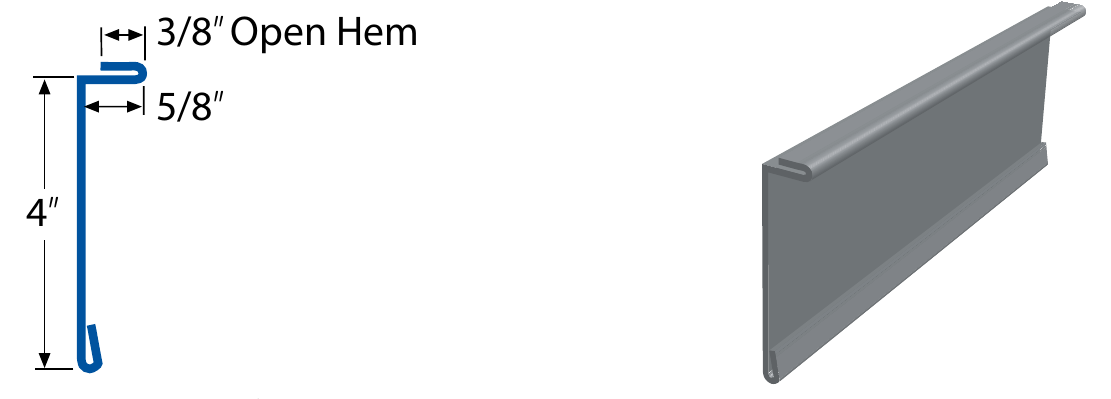
Runs up the sloped rake edge of a gable, capping the cut panel ends and the edge of the deck. It exists to keep wind-driven rain from working under the panels at the most exposed edge of the roof, and the open hem creates a drip so water lets go instead of wrapping back underneath.
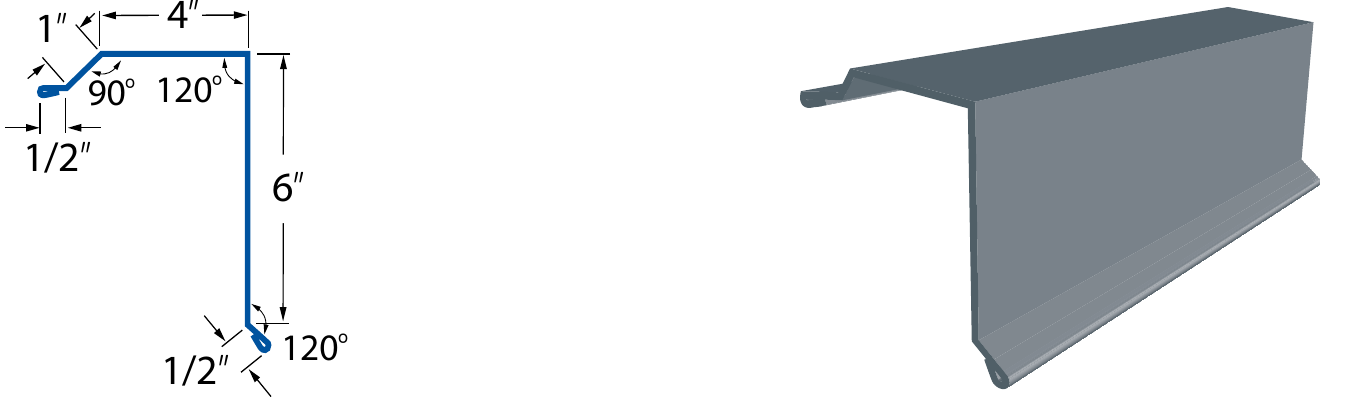
A rake trim shaped for a stepped or offset gable, where the roof or wall line jogs instead of running straight. The added return lets it follow the step while still covering the panel ends, doing the gable's edge-sealing job on rooflines that are not a clean straight rake.
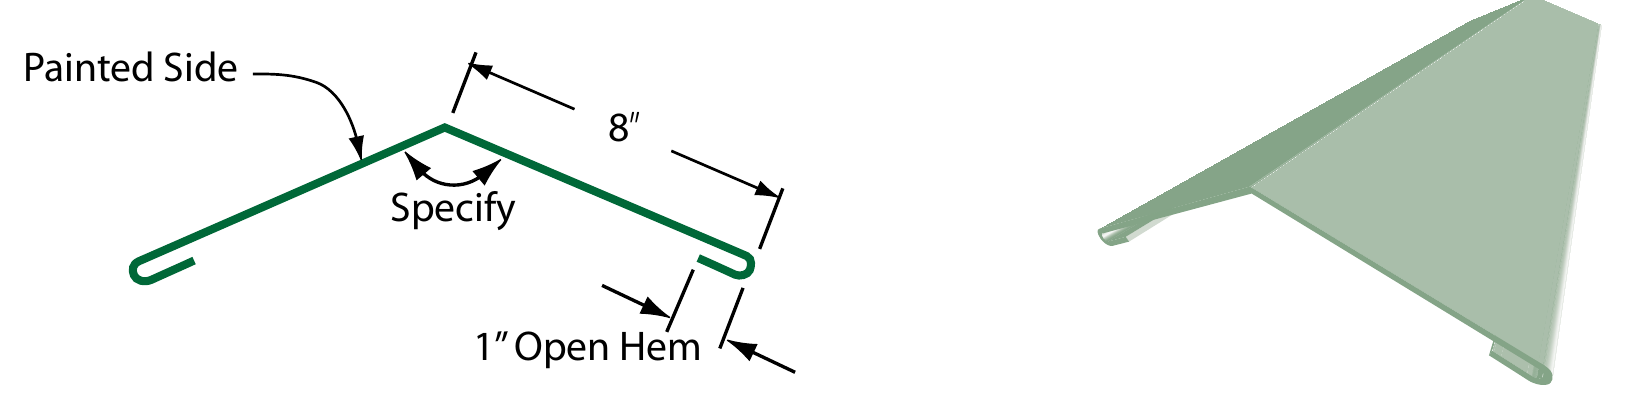
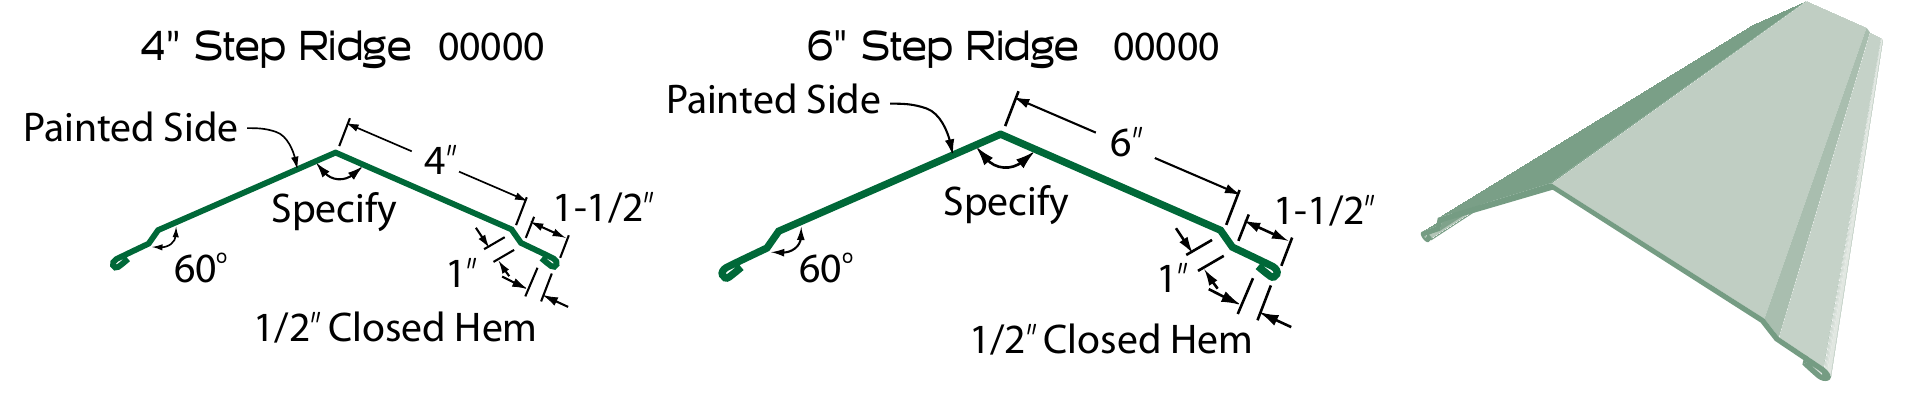
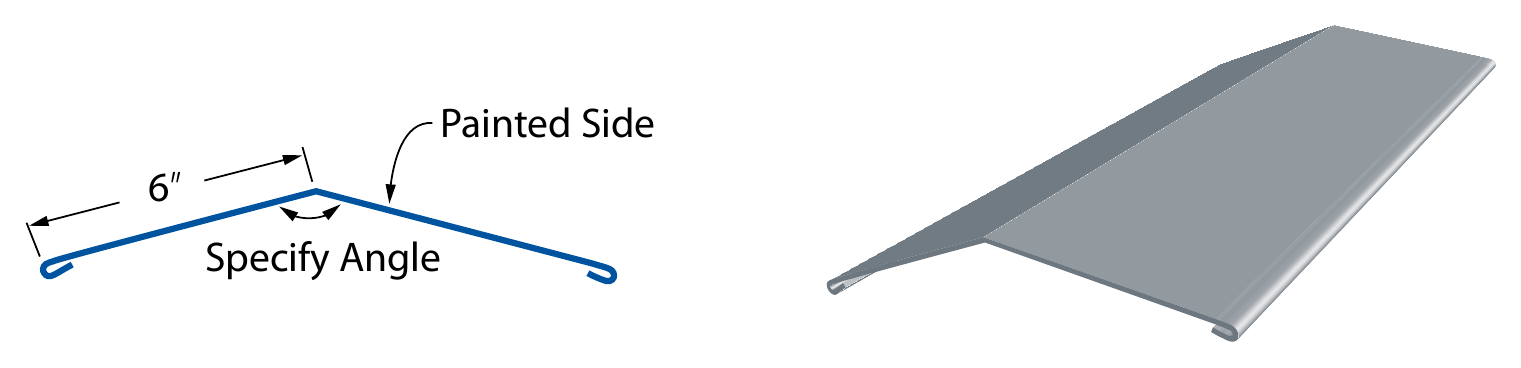
Caps the peak where two slopes meet at the ridge, or the sloped line where they meet at a hip. It closes the gap left between the tops of the panels and sheds water to both sides. The bend is made to the roof because ridge and hip angles vary, which is why it is specified.
A ridge cap profiled for a stepped or transitional ridge, in 4″ and 6″ coverage. The closed hem and bend pattern let it seat over the panels and lock down, doing the ridge's water-shedding job where the peak is not a simple straight line.
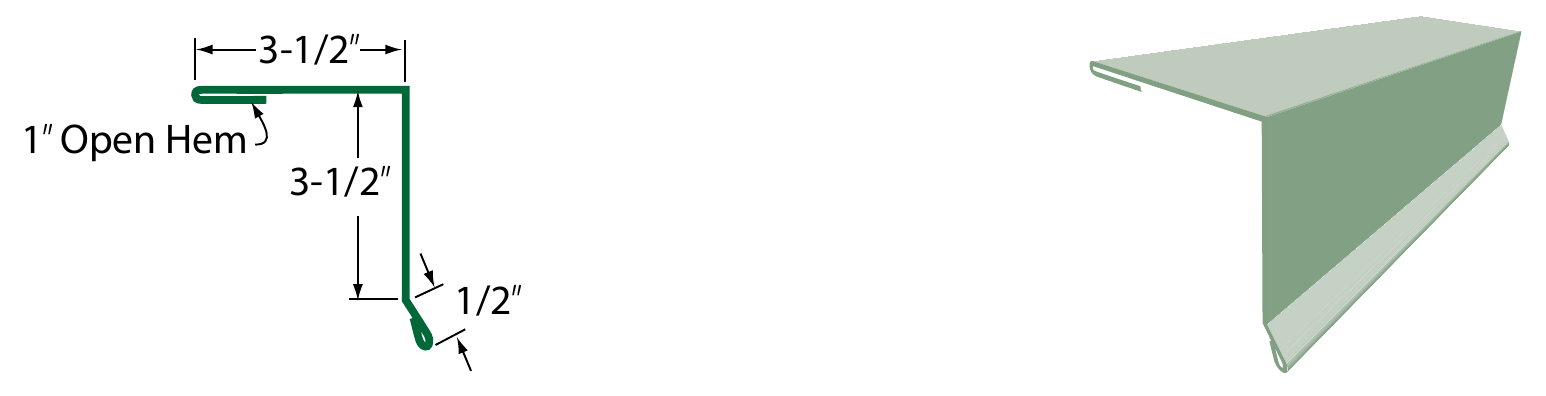
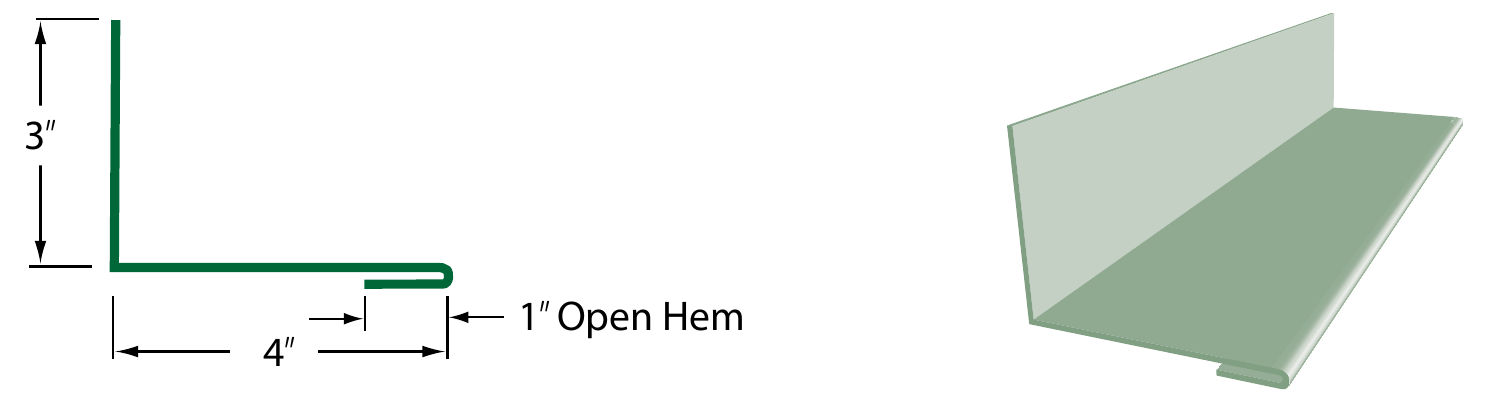
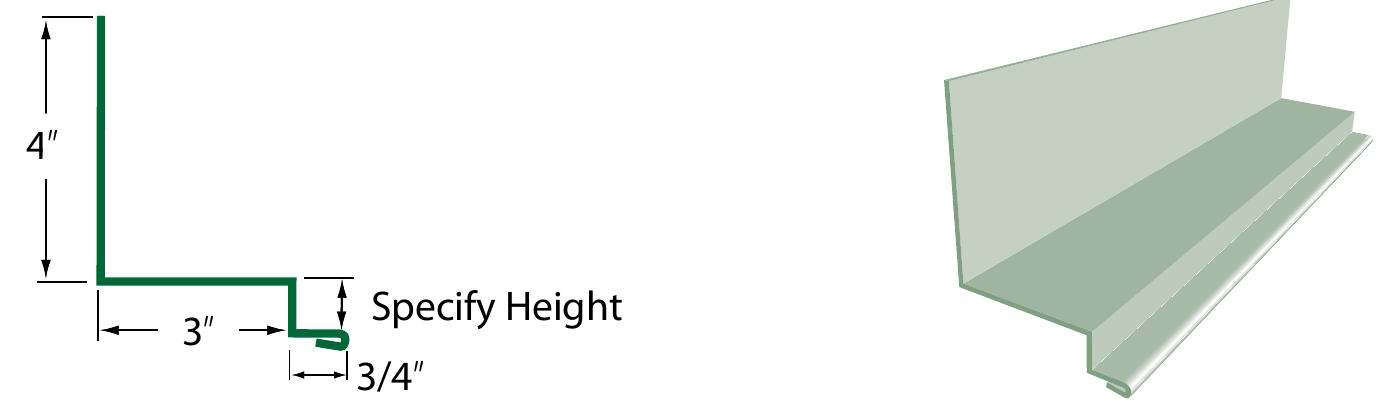
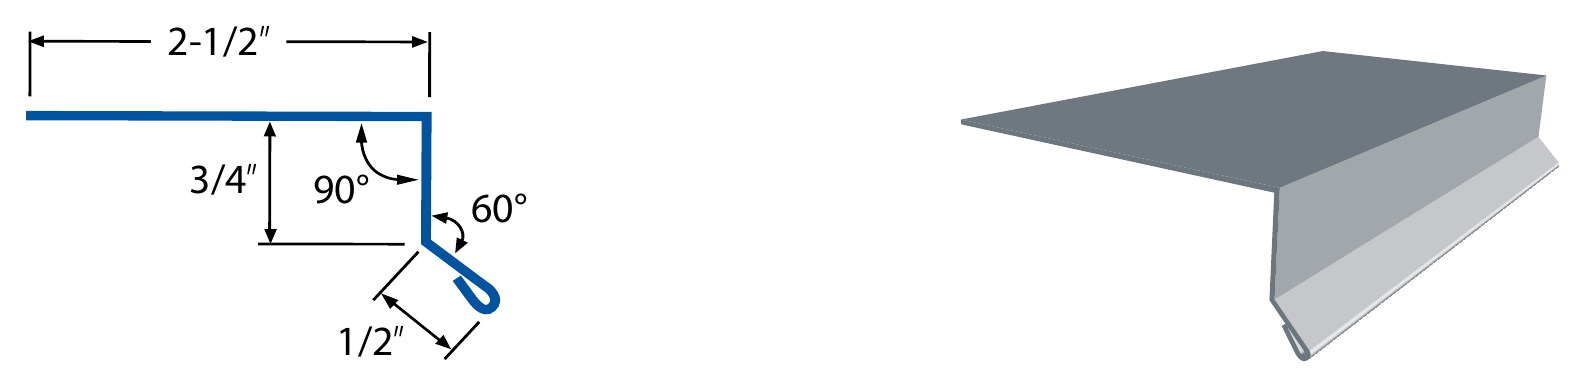
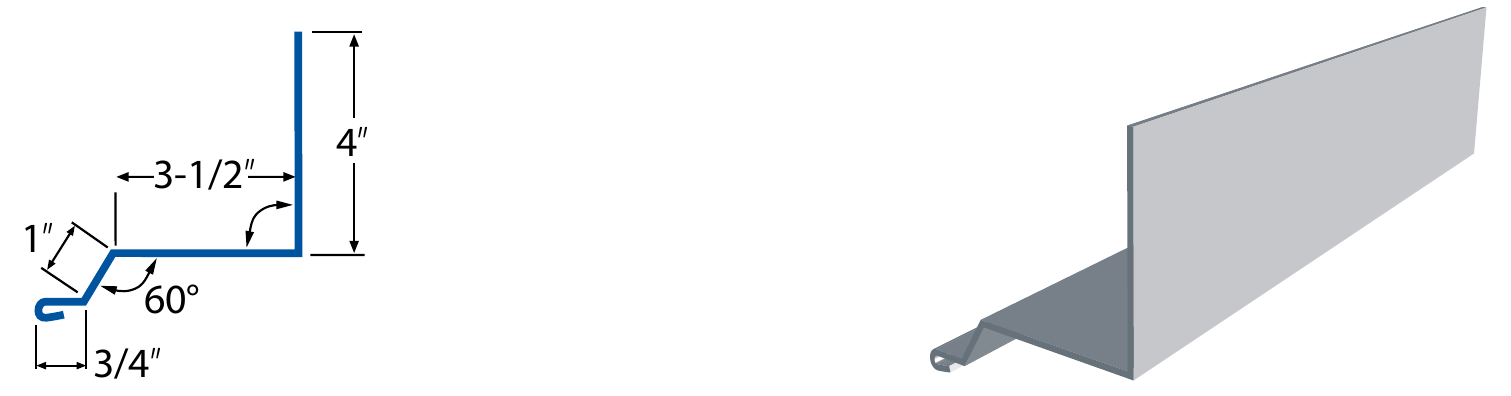
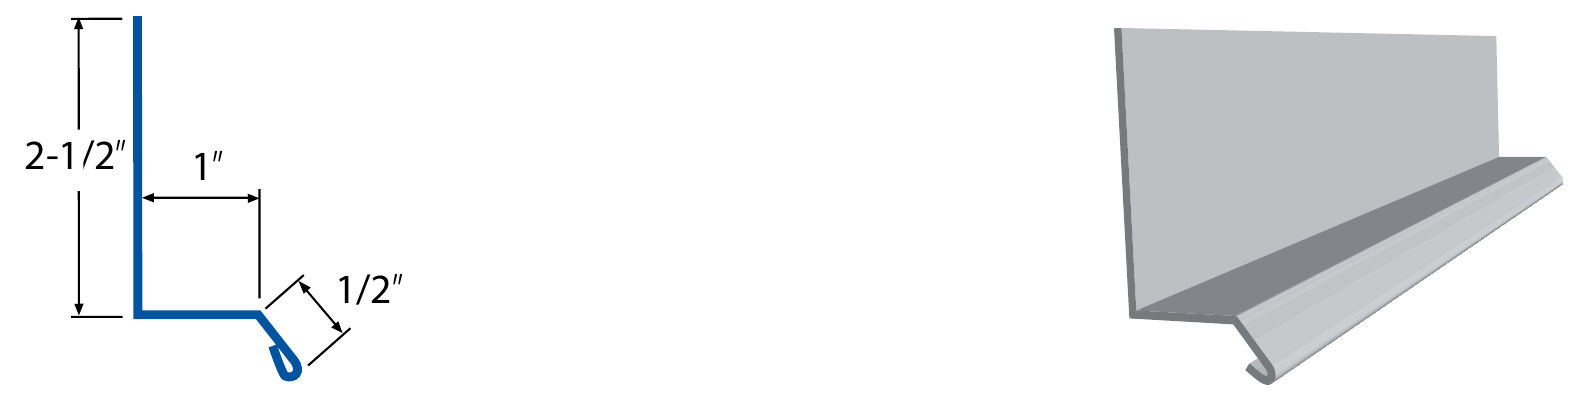
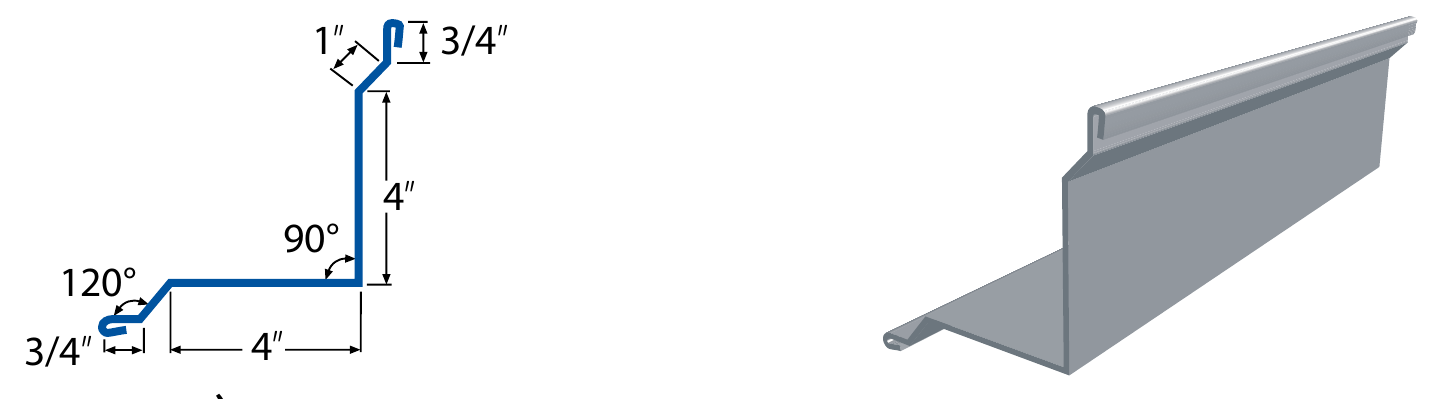
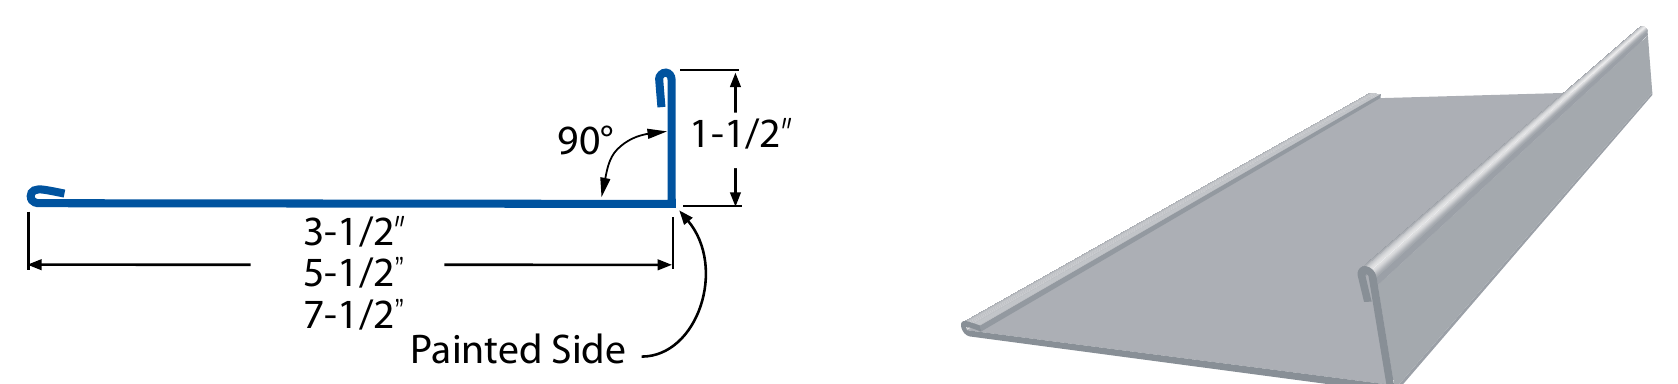
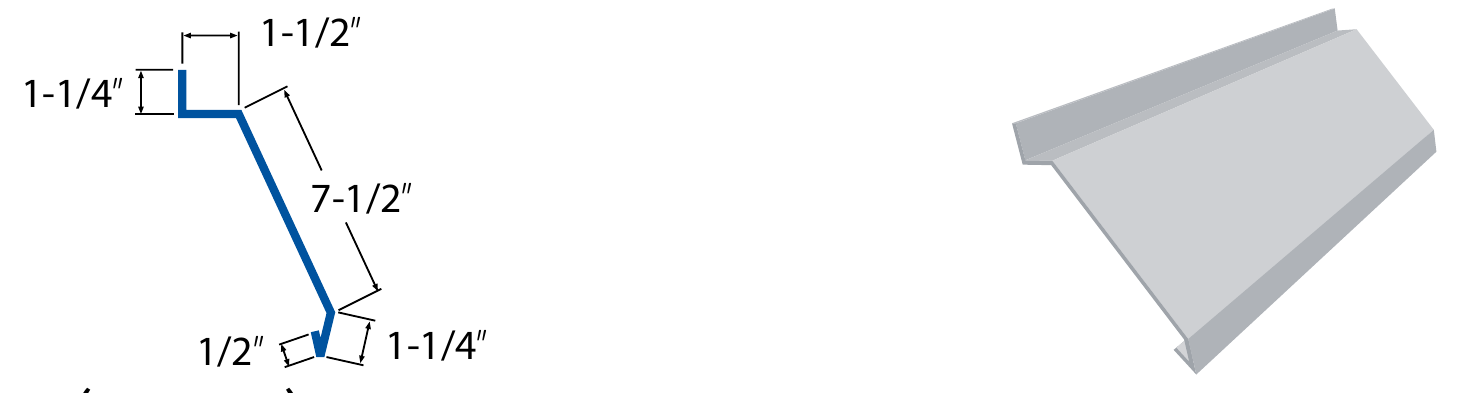
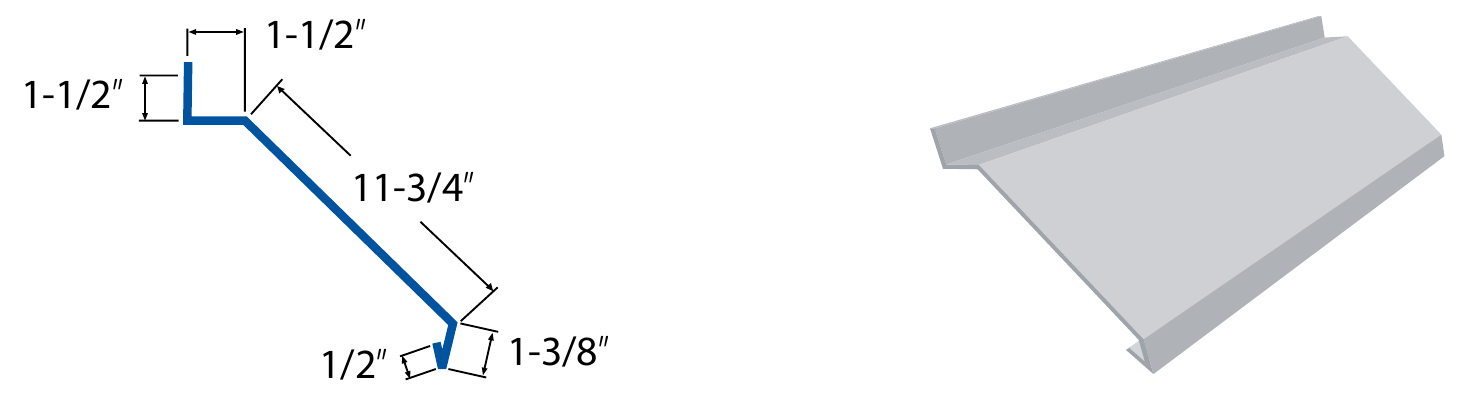
Sits at the bottom edge of the slope and carries water off the panels and out past the fascia. The extended leg pushes the drip line away from the wall and into the gutter, which is what decides whether the eave drains cleanly or runs back behind it.
Where the roof meets a wall or changes pitch. These are the details water finds first, so they are flashed, not caulked.
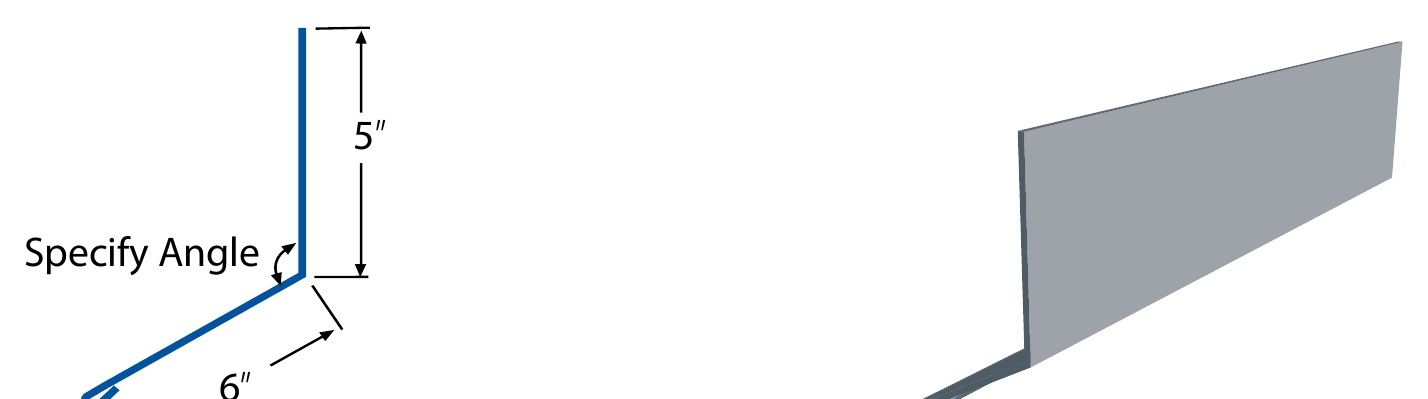
Seals the joint where the top of a slope runs into a wall above it. It directs water coming down the wall out onto the panels instead of behind them. Without it, the head of the slope is the first place a wall-to-roof junction leaks.
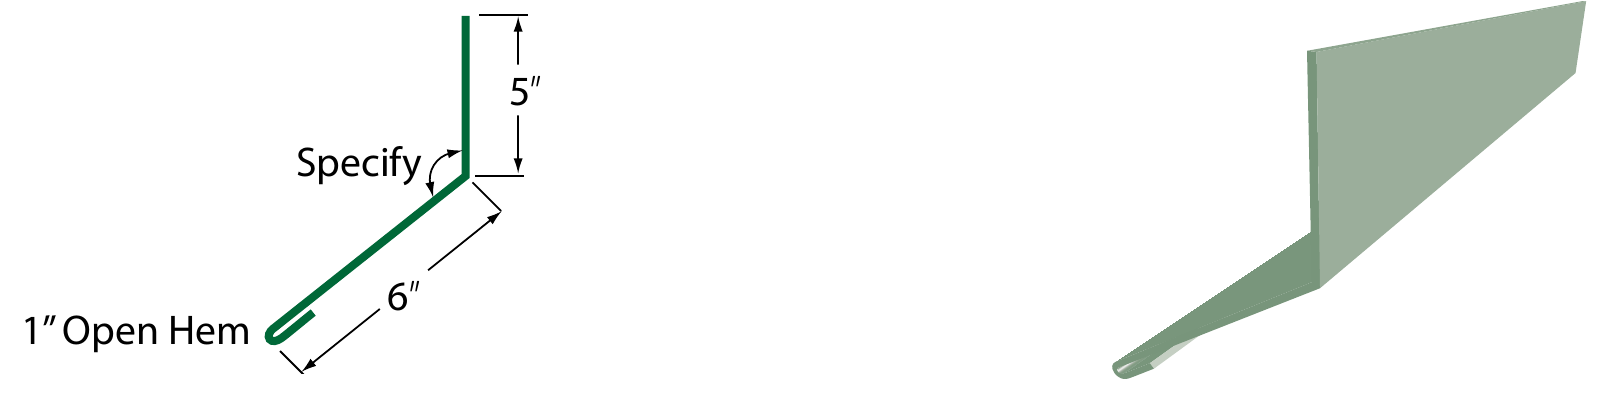
Flashes the long run where a slope meets a wall that rises alongside it. It tucks under the wall covering and laps over the panels so water sheds onto the roof. This is the wall junction that runs with the slope, as opposed to the endwall that runs across it.
A sidewall flashing stepped to follow a wall that rises in increments, such as masonry courses or a stepped facade. The height is set to the wall, so it is specified, and it keeps that line watertight where the wall is not a single flat plane.
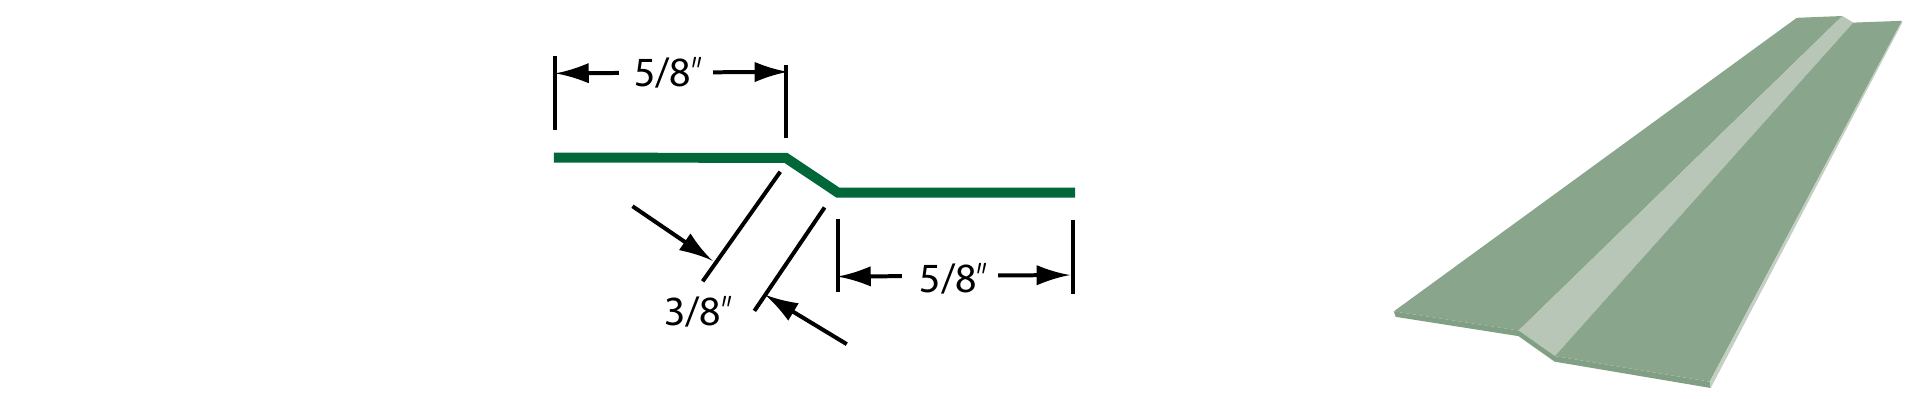
Joins two roof planes that change pitch, such as where a steeper upper slope meets a shallower porch slope. The bend is made to the actual angle, so it is specified, and it keeps water moving across the break instead of catching at it.

The channel where two slopes drain together. Valleys move the most concentrated water on a roof, so the profile matters.
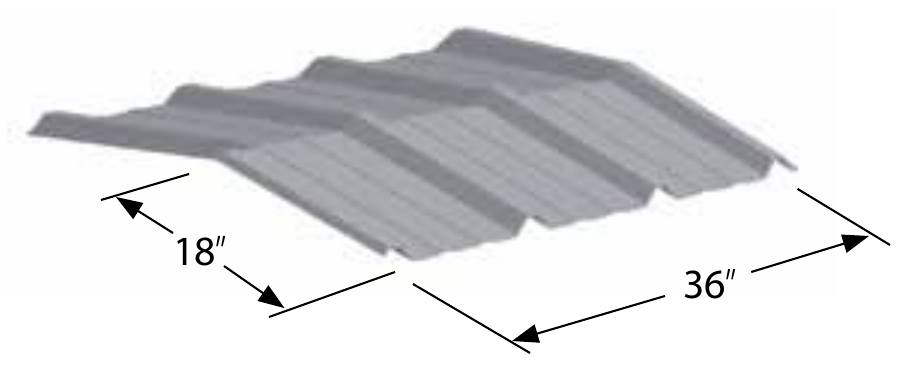
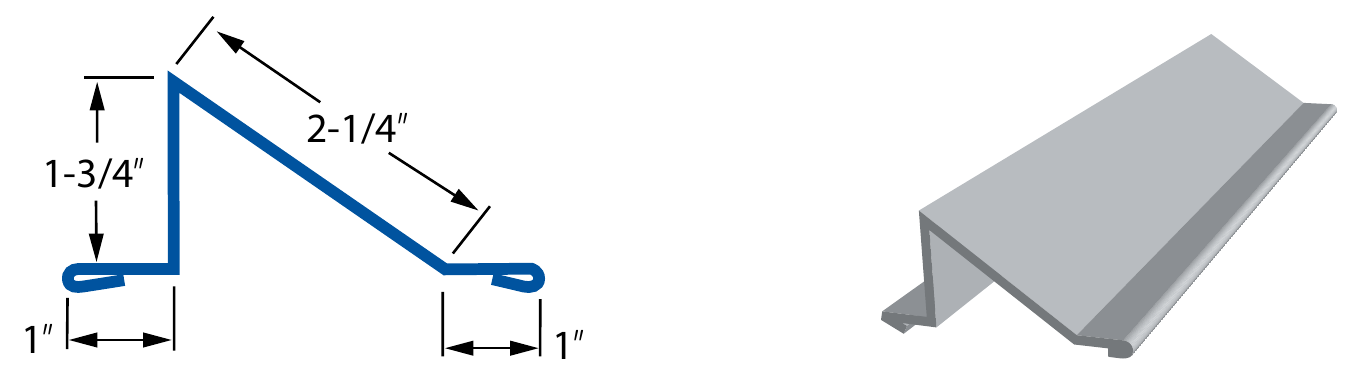
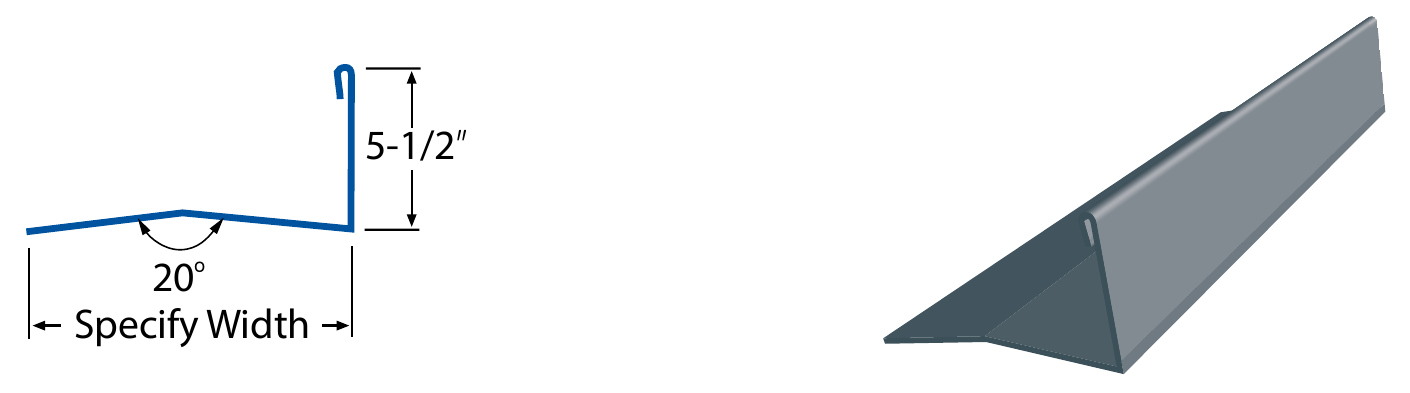
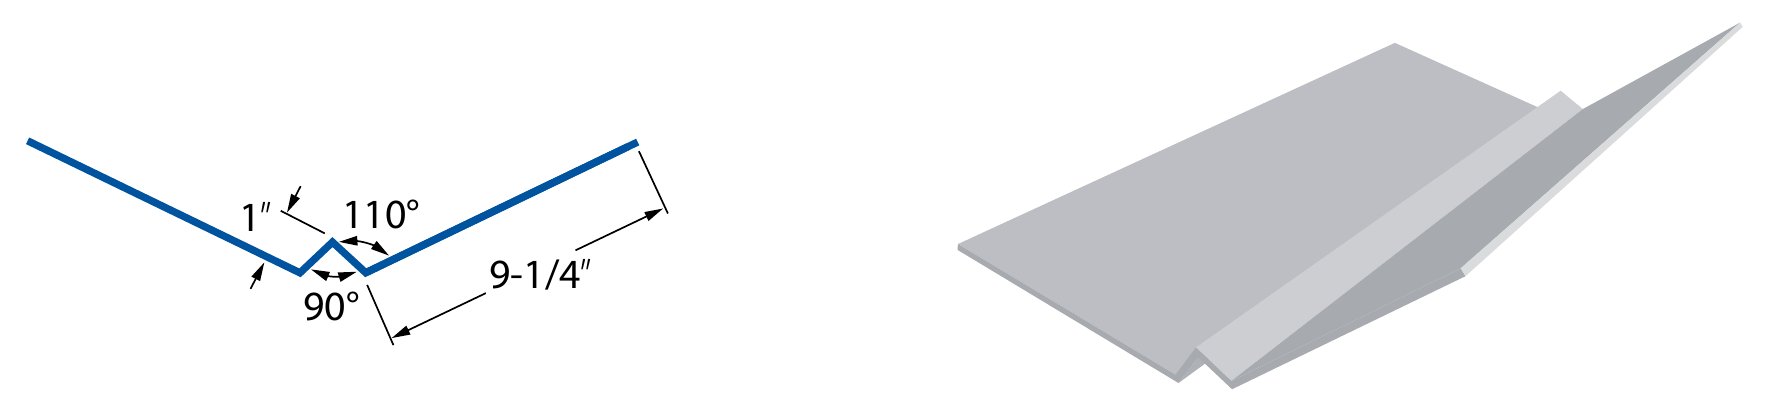
Carries water where two slopes drain into each other. The center “W” rib keeps the two streams separated and stops water from one side jumping the valley to the other, which is how a hard rain stays in the channel.

Anchors the valley metal to the deck along its edges so it cannot lift or shift under water load and thermal movement. It keeps the valley fixed while still letting it be a continuous, fastener-free channel in the water path.
Concealed and sealing pieces. Cleats hold edges down without face fasteners; closures shut the open ends of the panel.
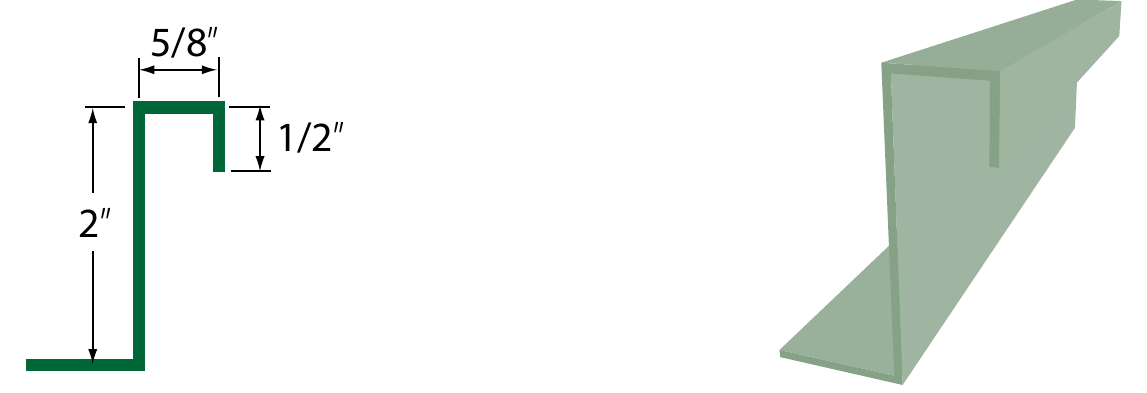
A concealed strip that hooks the edge of a panel or trim and fastens to the deck, holding the edge down without a screw through the face. The offset lets the visible metal sit flush while the cleat hides beneath, which is how edges stay locked with no fasteners on the weather surface.
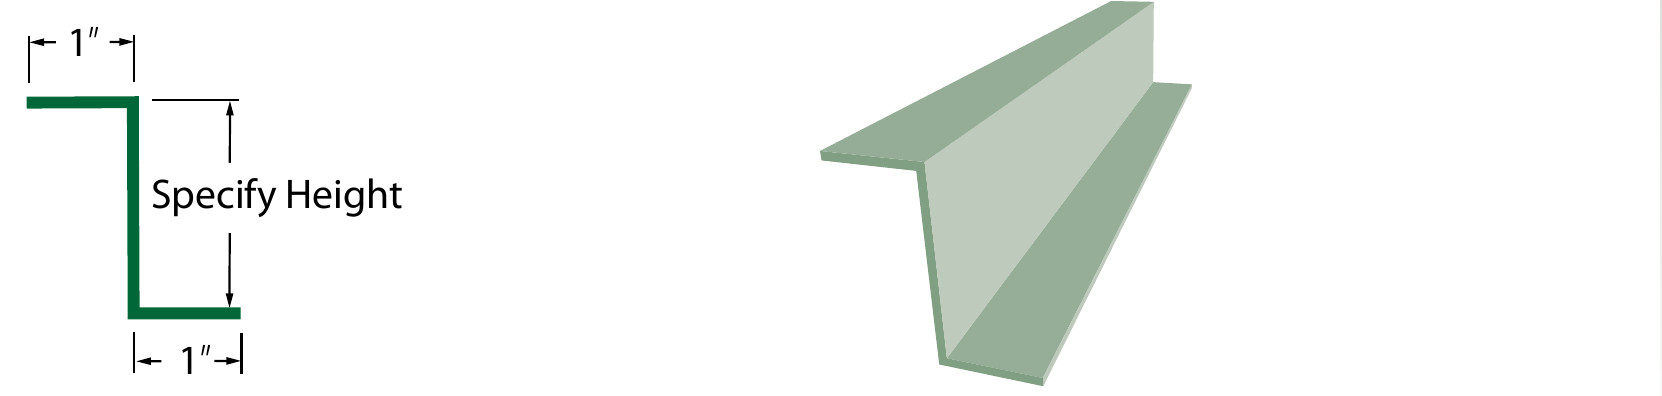
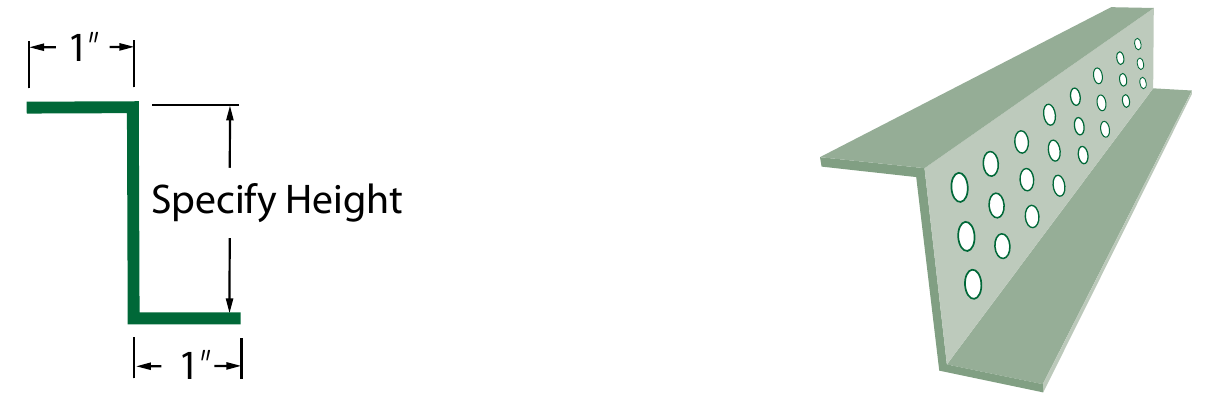
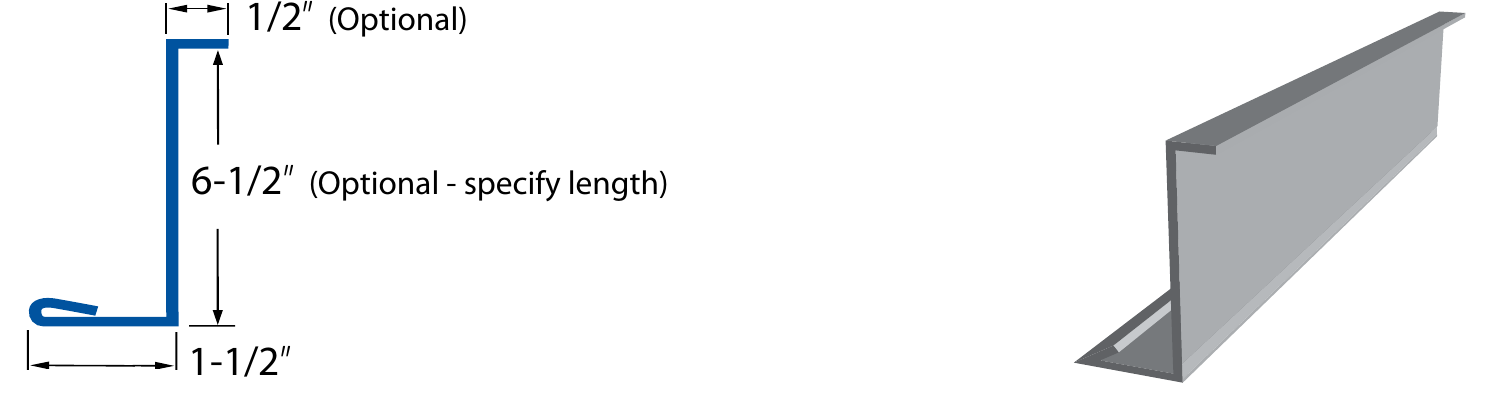
A small Z-shaped strip that closes the open end of a panel where it stops at a ridge, eave, or transition. It blocks wind, rain, and pests from entering the rib cavities while giving trim something to seal against. Height is specified to match the panel.
The same end closure with perforations, used where the roof needs to breathe, such as a ridge or eave intake. It closes the panel ends to weather while letting attic air move through, solving closure and ventilation at the same line.
The concealed fastening system that keeps screws off the weather surface and lets panels move with temperature.
The concealed clip for mechanically seamed panels, where the seam is folded over the clip with a powered seamer. It holds the panel to the deck and lets it expand and contract with temperature, with no fastener through the face. Mechanically seamed clips are chosen for low slopes and high exposure.
The concealed clip for snap-lock panels, where the next panel snaps over the clip leg by hand. It does the same hold-and-move job as the mechanical clip on the more common residential profile, and it is faster to install on standard slopes.
System Two · Classic Panel
Exposed-fastener, or classic panel, screws through the face of the panel and is the rugged, budget-friendly system for barns, shops, and simpler rooflines. Its light-gauge trim set is broad, covering walls, corners, doors, and openings as well as the roof itself.
The peak of the roof, where two slopes meet and the top joint has to shed both ways.
Caps the peak of an exposed-fastener roof in 12″ and 16″ coverage. It bridges the gap between the tops of the panels on each slope and sheds water both ways. Angle is specified because ridge pitch varies, and the wider cap suits wider ribs and higher exposure.

A lower-profile cover for the ridge or hip line where less coverage is needed. It closes the top joint and directs water to both slopes, with its bend made to the roof angle.
A pre-formed ridge cover stamped to match the panel's rib pattern. Because it is shaped to the profile, it seats tightly over the ribs rather than relying on closures alone, giving a clean pre-shaped ridge on a ribbed roof.
The lower and side edges. Rake, eave, and drip trims send water off the roof and finish the gable.
A compact rake trim for the gable edge, used where a smaller, tighter edge is preferred. It caps the panel ends along the rake and forms a drip, serving as the lighter version of the full gable trim on simpler or smaller roofs.
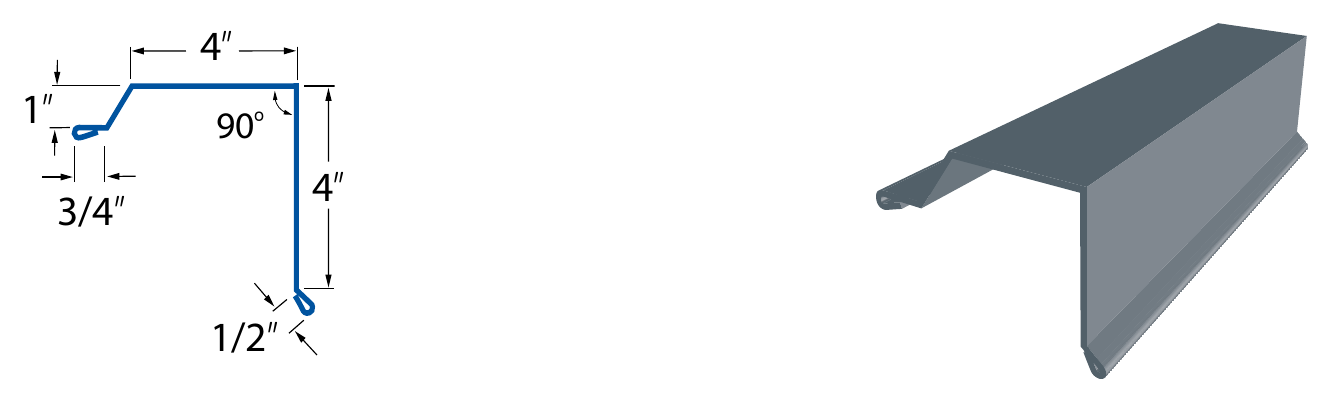
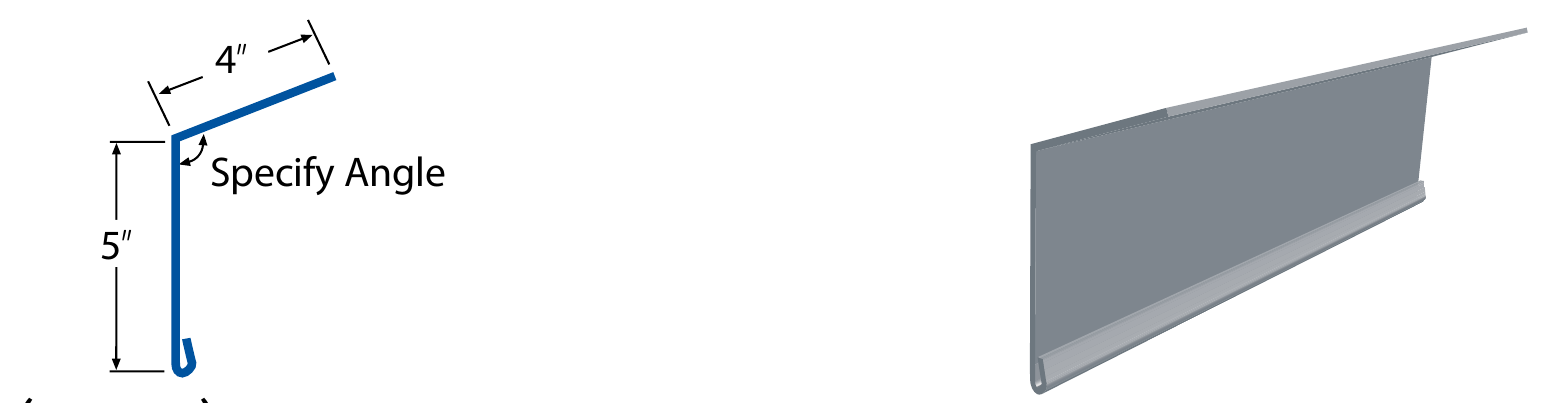
The standard rake trim for an exposed-fastener gable, covering the cut panel ends up the slope edge. It keeps wind-driven rain out of the rake, and its bends and hem give it a stiff, draining edge.
The edge trim along the eave or rake that lifts water off the deck and throws it clear. The bent lip forms the drip line so water releases instead of curling back under. It is the most basic edge-protection trim on the roof.
A small cap that sheds water out and away above a window, door, or wall opening. It stops water from running down the wall and into the head of the opening, a head-flashing piece carried onto metal-clad walls.
Finishes the eave edge and is also used at the upper break of a gambrel roof where the pitch changes sharply. The specified angle lets one profile serve both spots, carrying water off the lower edge of each plane.
Mounts near the eave to hold snow on the roof so it melts and sheds gradually instead of releasing in a sudden slide. It protects gutters, landscaping, and anyone below, and matters most on steeper or higher-exposure roofs.
Where panels meet walls and ground. Wall, soffit, base, and fascia trims close the building's edges.
Flashes the run where a slope meets a wall beside it, lapping over the panels and tucking behind the wall covering. It is the wall junction that follows the slope, and it keeps that long seam from feeding water behind the panels.
Flashes the slope where it meets a wall above, or joins two roof pitches at a break. The angle is specified because both conditions vary, and it moves water across or out of the junction instead of letting it pool at the change.
Closes the underside of the eave overhang where the roof extends past the wall. It finishes the soffit line and keeps weather and pests out of the overhang, with width set to the overhang.
Covers the fascia board along the eave, optionally cut to length. It protects the wood and ties the eave into the metal finish, a cladding trim for the horizontal eave board.
Closes the bottom edge of wall panels at the base of the wall. It caps the open ends and gives the wall a clean ground line, so the bottom of the panel is not an open, snag-prone edge.
A two-bend piece used as a closure or transition where a single angle will not follow the shape. The two bends let it step around a change in plane, making it a versatile filler for odd junctions.
Vertical corners and the wall base. Corner trims wrap the building; the rat guard seals the bottom against pests.
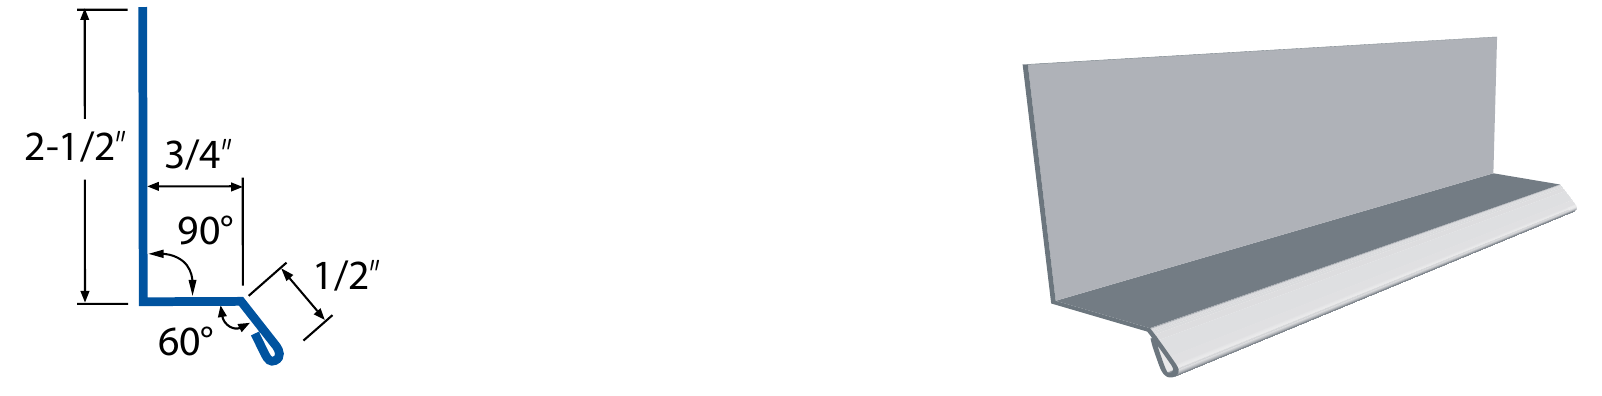
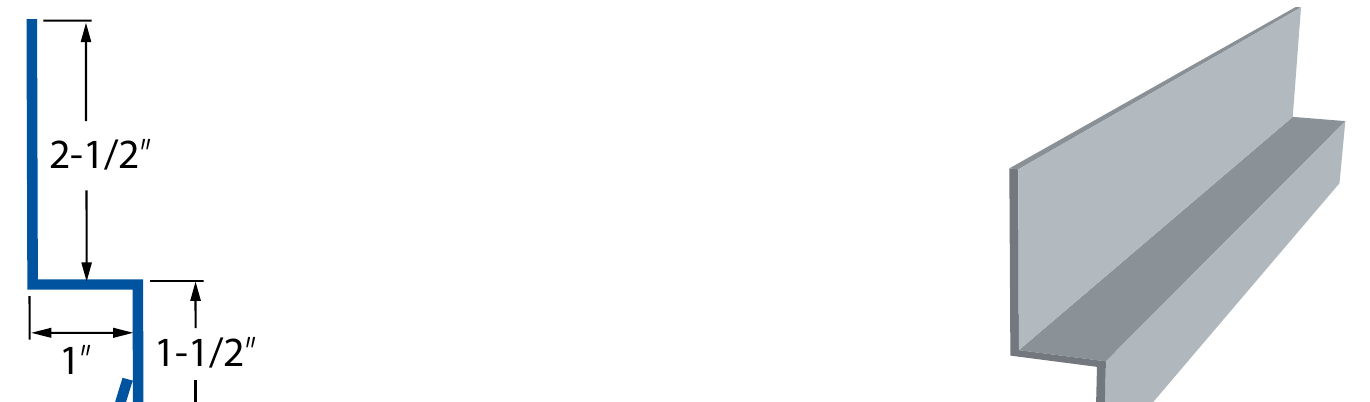
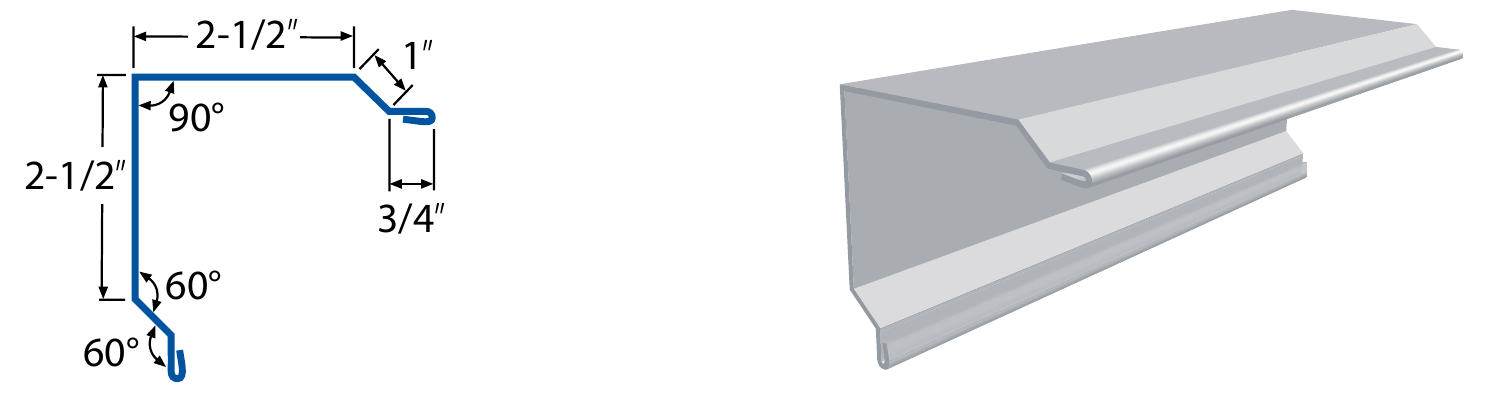
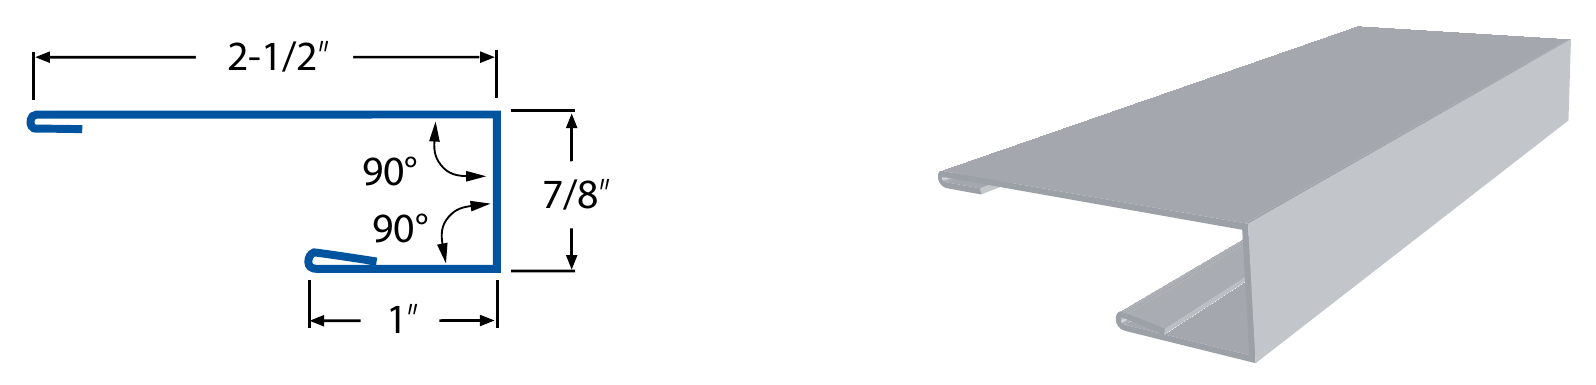
Wraps an outside wall corner with 2-1/2″ legs, closing the gap where two wall panels meet. It keeps wind and water out of the corner joint and gives a finished vertical line, with the smaller leg suiting a tighter look.
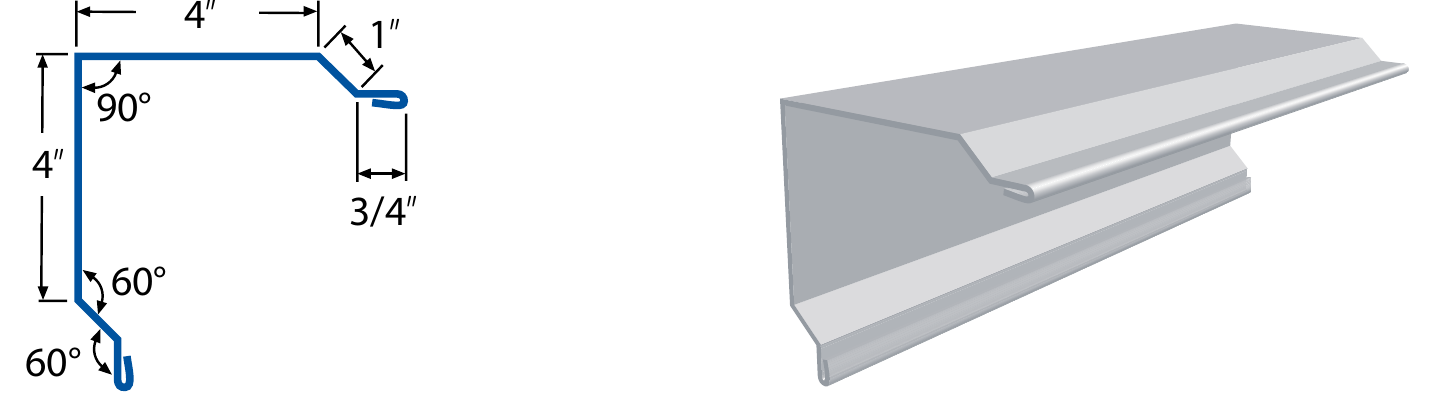
The same outside-corner wrap with 4″ legs for more coverage. The wider leg hides more of the panel ends and handles more exposure; the choice between the two is about coverage and look.
Wraps an inside wall corner where two walls meet in a recess. It closes that inside joint against weather and finishes the line, the inside counterpart to the outside corner.
Closes the open ribs at the very bottom of a wall panel so rodents and pests cannot get in behind the metal. It seals the base line that is otherwise a row of open gaps, a small piece that solves a specific entry problem.

Where water concentrates. Valley channels carry runoff, and counter-flashing seals the chimney.
The valley channel for an exposed-fastener roof, with a hemmed edge that stiffens the metal and forms a clean drip line. The center rib keeps the two streams apart, and the hem adds rigidity where the valley edge would otherwise be sharp and floppy.

The same valley without the hemmed edge, used where the hem is not needed or the edge is captured another way. It carries the same concentrated valley water; the choice depends on how the valley edge is finished.
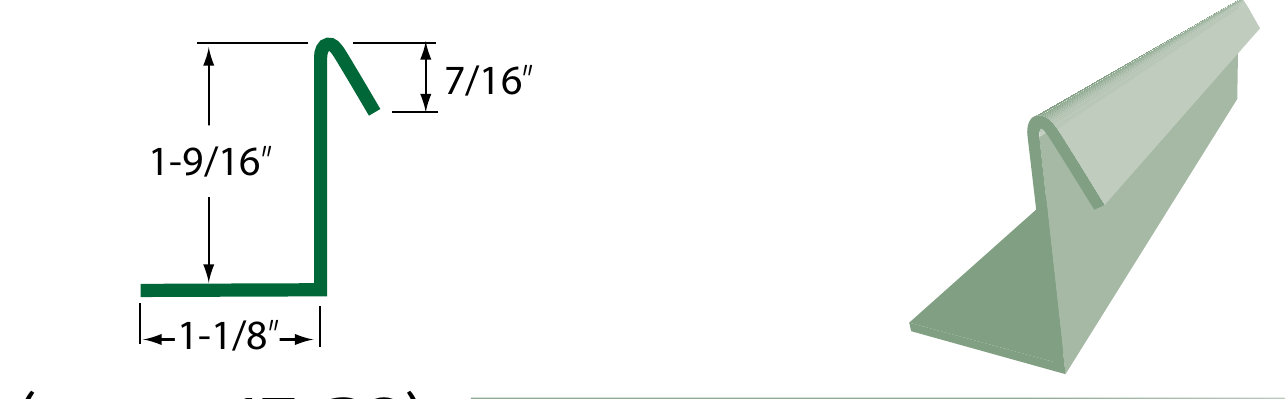
The upper flashing at a chimney, let into the masonry and lapped over the base flashing below. It is the piece that makes the roof-to-chimney joint shed water for the long term, with the open hem forming the drip and the top edge tucking into the mortar line.
Openings and framing. Channels, post wraps, and door trims finish jambs, tracks, and edges.
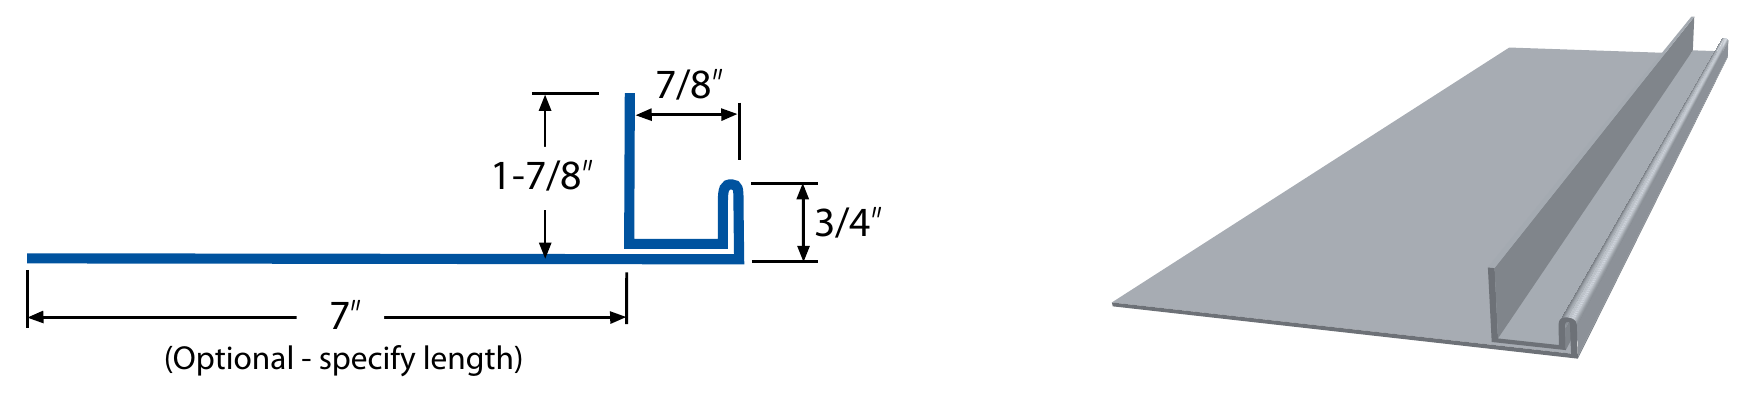
A J-shaped receiver that panel ends or other trims slide into at edges and openings. It gives a clean pocket for the panel to terminate into around doors, windows, and gable ends, hiding the cut edge so it cannot catch wind.
Combines an F-channel and a J-channel in one profile, giving two receiver pockets in a single piece. It is used where panels or soffit terminate and need both a face and an edge receiver, saving the step of stacking two separate channels.

Wraps an exposed structural post, with one painted face shown to the weather. It protects the post and ties it into the panel finish, a cladding piece for framing rather than a roof flashing.
Covers the exposed track of a single sliding door, common on barns and shops. It keeps weather and debris off the track and hides the hardware, protecting a moving part rather than a roof joint.
The wider cover for a double sliding-door track. It does the same protective job across a longer span of hardware, used on larger barn and equipment openings.
Frames the head and jambs of an overhead, roll-up door opening, optionally cut to length. It closes the panel edges around the opening and gives the door a finished frame, protecting the cut edges where the wall is interrupted.
Homeowner Questions
The questions homeowners ask most about the trim and flashing on a metal roof, answered plainly.
A metal panel sheds water on its own and rarely fails out in the open field. Almost every leak starts at a detail: a valley, a wall or chimney junction, a pipe or vent penetration, or an edge where the panel stops. Those are exactly the places trim and flashing cover. So when a metal roof leaks, the honest first suspects are the flashings and their sealant, the fasteners, and how the edges were terminated, not the panel itself. That is why the care that goes into the trim matters more to a dry house than which panel brand is on top.
Several trims are bent to your actual roof rather than pulled from stock, so the angle, height, width, or length is set per job. A ridge cap, an endwall, or a transition has to match the real pitch where two planes meet, and that angle is rarely a round number. Custom-formed pieces take a brake or a coil run and a little lead time, which can add cost over a plain stock length. It is not padding. It is the difference between a piece that seats tight and sheds water and one that is forced to fit. When you see specify on a line, it means that piece is made to your roof.
Trim and flashing should be new with a new roof. Old flashing has already cycled through years of expansion, sealant failure, and fastener wear, and reusing it puts the weakest parts back into the most important spots. Counter-flashing at a chimney or wall, valley metal, and edge trims are inexpensive next to the leak they prevent, so they are not the place to save. Going over an existing roof is sometimes possible, but the details still get reflashed either way. The panels are the easy part. The junctions are the work, and a good estimate spells out new flashing at every penetration and transition.
The metal and its factory paint finish are built to last for decades, and quality trim is formed from the same coil so it ages with the roof. The shorter-lived parts are the sealants and closures, the butyl tape and caulk that back up the metal-to-metal laps. Those are wear items that can be inspected and refreshed long before they cause a problem. Well-detailed trim leans on hems, cleats, and overlaps to shed water so the sealant is a backup, not the only line of defense. That is the difference between a roof you check occasionally and one that is always chasing a leak.
Standing seam hides its fasteners under concealed clips and folded seams and is the clean architectural look most people picture, well suited to homes and lower slopes. Exposed fastener, or classic panel, screws through the face and is the rugged, budget-friendly choice common on barns, shops, and outbuildings. The trims are shaped to each system, so a standing seam ridge or eave is not interchangeable with an exposed-fastener one. You can run different systems on different structures on the same property, but a single roof plane should be one system, trimmed to match. Which one fits comes down to look, budget, slope, and how the building is used.
Exposed-fastener panels are held down by screws driven through the face, each with a washer that seals the hole. Over many years of heat, cold, and movement, those washers can harden and the screws can loosen or back out slightly, which is the most common source of slow leaks on this system. The fix is routine: the fasteners get checked, re-seated, and replaced as needed, often with a slightly larger gasketed screw. It is expected maintenance, not a defect, and it is the main reason exposed-fastener roofs need periodic attention. Standing seam avoids it by keeping fasteners off the weather surface entirely, which is part of what you pay for.
A valley collects the water from two slopes and funnels it into one fast-moving channel, so any flaw there is tested by the heaviest flow on the roof. A chimney interrupts the field of the roof and has to be flashed on all sides, with counter-flashing let into the masonry so water cannot run behind the metal. Both spots combine concentrated water, multiple planes, and the work of other trades, which is why they leak first when they are rushed. Done right, the valley metal runs continuous and the chimney is stepped and counter-flashed, not just caulked. When we inspect an older roof, those are the first two places we look.
Less than an asphalt roof, but not nothing. Keep valleys, eaves, and the bases of walls clear of leaves and debris so water and snowmelt can leave the roof instead of backing up under the trim. On exposed-fastener roofs, have the screws and washers checked every few years. On any metal roof, the sealant and closures at penetrations and transitions are the wear items to watch, along with the gutters the eave trim drains into. A short look once a year, especially after a big storm, catches the small things while they are still cheap to fix.
Most Middle Tennessee roofs do not see heavy snow, so snow rails are not automatic here. They matter most on steeper metal roofs and anywhere snow sliding off in a sheet could hit a walkway, a lower roof, a gutter, or landscaping below. Metal sheds snow far more readily than shingles, so even a modest snow can release all at once. If you have a steep slope over an entrance, a porch, or a driveway, a snow rail near the eave holds the snow so it melts and leaves gradually. It is a targeted piece for specific spots, not something every roof in this area needs.
From the ground, look at the lines: ridge, hips, rakes, and eaves should run straight and tight, with clean drip edges and no waviness or gaps. At walls and chimneys, the flashing should tuck up under the wall surface or into the masonry, not just sit on top sealed with a bead of caulk. Valleys should be continuous metal rather than patched, and penetrations should have proper boots or flanges instead of a mound of sealant. On exposed-fastener roofs, the screws should sit in straight rows, snug and not overdriven. If the answer to a junction is mostly caulk, that is the spot to ask questions, because sealant is meant to back up the metal, not replace it.
Closures · Sealants · Fasteners · Insulation