Metal Roofing Alliance Member
TVA Preferred Partners Network
10,000+ Metal Roof Jobs
Nashville, TN
Licensed & Insured
BBB A+

Open 8am–8pm
(615) 649-5002Schedule Your
Appointment
Appointment
✦ Reviewed by The Metal Roofers Technical Team
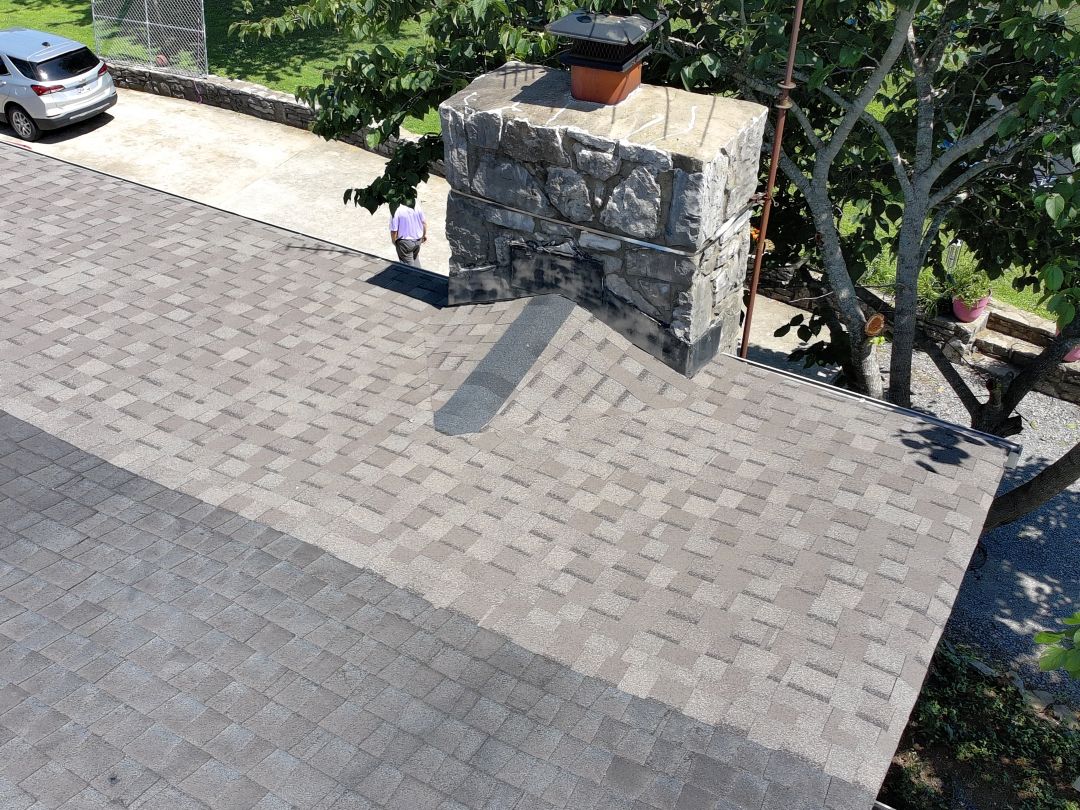
Chimney flashing is likely the cause of a roof leak when water appears near or below the chimney and the leak worsens during wind-driven rain. Water around a chimney is one of the hardest roof leaks for homeowners to diagnose because the leak rarely shows up directly under the hole. A stain on the ceiling may appear beside the fireplace, several feet downhill from the chimney, along an interior wall, or even at a light fixture. By the time water becomes visible indoors, it may have already traveled along roof decking, framing, underlayment, insulation, or the chimney chase.
The most important thing to know is this:
A chimney flashing leak is usually not a “hole in the roof.” It is a failure at the transition where the roof system, chimney masonry, underlayment, panels, trim, and counterflashing are supposed to move water down and out.
That distinction matters. A tube of caulk may hide the symptom for one storm, but it will not rebuild the water-management system around the chimney. Building Science Corporation describes rain control as a layered strategy: deflect water first, drain what gets behind the surface, and allow the assembly to dry. It also warns that single-line, face-sealed joints that depend on caulk alone have poor long-term performance.
If water is already entering your home, start with a professional metal roof inspection or metal roof repair in Nashville. The Metal Roofers’ repair process focuses on finding the source of the leak, not just covering the visible stain, and their repair page specifically calls out flashing transitions, chimney flashing, skylight flashing, pipe boots, fasteners, valleys, and storm-related damage as common leak points on metal roofs.
Chimney flashing is a likely cause of a roof leak when the water appears near the chimney, below the chimney on the roof slope, or along a wall or ceiling line that lines up with the chimney. It becomes even more likely when the leak gets worse during wind-driven rain, when there is visible caulk or loose metal around the chimney base, or when the leak began after a roof replacement, chimney repair, or severe storm.
A chimney flashing leak often shows itself through patterns rather than one obvious hole. You may see a brown ceiling stain near the fireplace, damp drywall beside the chimney chase, peeling paint on an interior wall, water in the attic near the chimney framing, or staining on the roof decking where the chimney exits the roof.
The best clue is not where the water drips. The best clue is where the water first enters the roof assembly.
That is why a careful inspection matters. The Metal Roofers’ inspection page describes a full roof-system review that includes panels, seams, fasteners, flashings, penetrations, valleys, gutters, attic conditions, ventilation, and moisture pathways. That broader approach is important because chimney leaks can be confused with pipe boot leaks, ridge leaks, valley leaks, condensation, masonry leaks, or gutter-edge water problems.
Chimneys are common roof leak points because a chimney is a vertical interruption in a sloped roof that blocks rainwater trying to move downhill. Water must be collected, redirected, and discharged around the obstruction without being allowed behind the roof covering or into the masonry.
That is the job of chimney flashing.
On a well-built roof, chimney flashing is not one piece of metal. It is a coordinated system. The front apron flashing protects the downhill side. Side flashing or step flashing protects the sides. The back pan, saddle, or cricket handles the uphill side where water collects. Counterflashing is cut into or properly attached to the chimney masonry so water cannot run behind the base flashing. Underlayment and roof-side water barriers must be lapped correctly beneath those metal pieces so any incidental water still drains outward.
The U.S. Department of Energy’s Building America guidance explains the core rule of water management clearly: water must be directed down and out, and flashing must be integrated with the roof and wall drainage planes. The same guidance notes that roof-wall intersections require flashing, and that continuous flashing may be used with metal and membrane roof systems.
The Metal Roofers make the same point in practical roofing language in their metal roof trim and flashing guide: leaks tend to happen where the panel stops, turns, meets a wall, enters a valley, reaches an edge, or gets interrupted by a pipe, skylight, or chimney. Their guide states that if trim and flashing details are rushed, “no sealant saves it.”
Around a chimney, every one of those risk factors is present at once. The roof plane stops. Water flow is interrupted. Metal panels must be cut. Masonry and metal meet. The roof system must shed water around a vertical wall. Sealants, laps, bends, hems, fasteners, underlayment, and masonry joints all have to work together.
That is why a chimney can leak even when the rest of the roof is in excellent condition.
A chimney flashing leak usually appears downhill from the chimney, not necessarily directly under it. Water that gets behind the flashing can run along the underside of roof decking, rafters, framing, insulation, or drywall before it becomes visible.
If the stain is on the ceiling near the fireplace, on the wall beside the chimney chase, or at the point where a vaulted ceiling meets a chimney wall, the chimney flashing should be near the top of the suspect list.
The key question is: does the stain line up with the roof slope below the chimney? On a sloped roof, water often enters at the chimney and travels downhill before it drips. That is why a leak that appears “away from the chimney” can still be caused by chimney flashing.
A roof can pass a light rain and still leak during a storm with wind. Wind changes the direction of water. Instead of simply falling downward and draining along the roof plane, rain can be pushed sideways, upward under laps, behind loose counterflashing, or into small gaps at the sides of the chimney.
Building Science Corporation identifies wind-driven rain as one of the major moisture loads that buildings must manage, and it explains that water-control details must account for real flow paths, not just vertical rainfall.
When a homeowner says, “It only leaks when rain blows from one direction,” that often points to side flashing, counterflashing, masonry cracks, or a poorly sealed reglet at the chimney.
Caulk around a chimney is not automatically bad. Sealant is often part of a flashing detail. But thick, smeared, cracked, peeling, or repeated layers of caulk are a warning sign.
Caulk becomes suspicious when it looks like it is doing the job that metal flashing should be doing.
A proper flashing system sheds water through shape, slope, laps, and counterflashing. Sealant should support the detail, not serve as the only line of defense. Building Science Corporation specifically warns that sealant-only joints are not a reliable rain-control strategy, especially where drainage has been interrupted.
Caulk is a maintenance accessory. It is not a chimney flashing system.
If you can see old caulk piled along the uphill side of the chimney, at the sidewalls, or where counterflashing meets brick, the leak may have been patched before without correcting the underlying water path.
If the roof was recently replaced and the chimney began leaking afterward, the flashing deserves immediate attention.
This is especially true on metal roofs because old shingle flashing details often do not translate directly to metal panels. The Metal Roofers’ repair page notes that older Nashville chimneys are especially vulnerable when the original flashing was designed for asphalt shingles rather than a metal roof system. It also explains that chimneys and skylights interrupt panel systems and create upstream water-management challenges that require the apron, cricket or saddle, and counterflashing to work as a complete system.
Metal roofing also expands and contracts with temperature changes. The Metal Roofers explain on their metal roof replacement page that standing seam systems are designed so panels can float on clips, while exposed-fastener panels are more constrained by screws and can enlarge holes over time.
That movement matters at chimneys. If flashing is fastened, sealed, or pinned in a way that fights panel movement, gaps can open as the roof cycles through heat, cold, sun, shade, storms, and seasonal temperature swings.
The attic often tells the truth before the ceiling does.
If you can safely access the attic, look for dark staining, damp decking, rusty fastener tips, wet insulation, moldy odor, or water marks near the chimney framing. The most revealing area is usually the uphill side and the two lower corners of the chimney opening.
A stain at the roof deck right where the chimney passes through the roof often points to flashing. A stain higher on the chimney masonry, especially above the roofline or inside the flue/firebox area, may point to masonry, crown, cap, or chimney liner issues instead.
Do not step onto a metal roof to investigate. Metal roofs can be slippery, and walking on panels incorrectly can damage seams, coatings, fasteners, or trim. Use attic access, binoculars, zoom photos, and a professional inspection.
Chimney flashing has one job: keep water moving outside the house.
That sounds simple, but the assembly is doing several jobs at once. It must bridge between roof material and masonry. It must protect the joint where the chimney exits the roof. It must redirect downhill water around the chimney. It must resist wind-driven rain. It must tolerate movement between masonry and metal. It must avoid trapping water. It must integrate with underlayment and roof panels. It must stay compatible with the metals around it.
The U.S. Department of Energy’s Building America flashing guidance explains that flashing is needed wherever the drainage plane is interrupted, including at intersections and penetrations. It also emphasizes that flashing must follow the “down and out” principle so water is directed back to the exterior rather than into the wall or roof assembly.
A chimney flashing system typically includes these elements, but the exact detail depends on roof type, chimney size, panel profile, slope, material, local code, and manufacturer requirements.
Apron flashing protects the downhill side of the chimney. This is the side most homeowners can see from the ground. It should direct water onto the roof surface below the chimney.
Side flashing protects the left and right sides. On asphalt shingles, this is often step flashing. On many metal roof systems, side flashing may be a continuous custom-bent detail designed around the panel profile.
Back pan, saddle, or cricket flashing protects the uphill side. This is one of the most important parts because it handles the water that runs down the roof and hits the chimney.
Counterflashing covers the top edge of the base flashing and is tied into the masonry. Its job is to keep water from running behind the flashing.
Underlayment and water-control layers provide backup protection beneath the visible metal.
The Insurance Institute for Business & Home Safety describes flashings as the components that weatherproof and seal roof edges, penetrations, walls, valleys, drains, and other interruptions. Its steep-slope flashing guidance also emphasizes that flashing should follow local code, manufacturer instructions, and the most restrictive applicable standard.
Metal roof chimney flashing is different because metal panels are longer, more continuous, and more sensitive to movement than shingles. A chimney on a metal roof is not just a chimney on “another type of shingle.” Metal panels behave differently from asphalt shingles.
Metal panels are longer, more continuous, and more sensitive to movement. Water runs quickly across them. Standing seam systems hide fasteners beneath raised seams. Exposed-fastener systems use screws and washers through the panel surface. Panel profiles create ribs, seams, laps, valleys, and water channels that flashing must accommodate.
The Metal Roofers describe standing seam metal roofing as a concealed-fastener system where panels lock at raised seams and clips or fasteners stay protected beneath the metal. That design avoids the exposed screw-and-washer maintenance cycle common to some other metal systems.
At a chimney, those panel advantages only work if the flashing is built for the system. Flashing must respect the panel profile, allow movement, keep fasteners out of primary water paths, and avoid relying on surface caulk where metal needs a shaped water-shedding detail.
A metal roof chimney leak often begins when someone treats the chimney like a shingle-roof detail: reused step flashing, generic L-metal, surface caulk, exposed fasteners too close to the water path, insufficient back pan length, or counterflashing that is attached to the face of the brick without a durable masonry termination.
Counterflashing fails when it is loose, missing, or sealed only with surface caulk, which lets water run behind the base flashing. Counterflashing is the upper flashing piece that overlaps the roof-side flashing and prevents water from getting behind it. On masonry chimneys, durable counterflashing is often cut into a mortar joint or reglet, then secured and sealed according to the detail.
If the counterflashing is loose, bent outward, cracked at the sealant line, or simply caulked to the face of the brick, water can run behind the flashing and enter the roof assembly.
IBHS guidance says counterflashing should extend below the top of the base flashing and be held above the finished roof surface. It also describes reglet-style counterflashing, where a groove is cut into the masonry joint and the flashing is secured and sealed into that groove.
A common homeowner clue is a horizontal crack in the sealant line above the flashing. Another clue is counterflashing that can be lifted by hand or has separated from the chimney face. From the ground, you may see the metal pulling away, rust staining below it, or a dark line where water has been running.
If the top edge of the flashing depends only on exposed caulk, the chimney is one sealant failure away from leaking.
Water ponds behind a chimney when the uphill side lacks a proper back pan, saddle, or cricket. The uphill side of the chimney takes the most abuse because it interrupts water flowing down the roof. Leaves, pine needles, small branches, ice, pollen, shingle granules from adjacent roof areas, and wind-driven debris can collect there. If the flashing is too short, too flat, poorly lapped, or missing a saddle or cricket where one is needed, water can pond behind the chimney.
A chimney cricket or saddle is a small sloped structure or flashing assembly that diverts water around the uphill side of the chimney. Not every chimney requires the same design, but every chimney needs the uphill water path handled deliberately.
The Metal Roofers’ repair page specifically identifies chimneys as roof interruptions that can create upstream dams and says the apron, cricket or saddle, and counterflashing must work together as a system.
A homeowner clue is debris constantly packed behind the chimney. Another is a leak that appears after long, steady rain rather than a brief shower. When water sits behind the chimney, small defects have more time to leak.
Metal roofs are profiled systems. The flashing has to match the panel geometry. A flat piece of metal laid over raised ribs, or a side flashing that does not integrate with seams and panel pans, can leave hidden channels where water travels sideways.
This is one reason chimney flashing on metal roofs is custom work. The shape, height, and width of the panel ribs matter. So do the seam type, fastener type, roof slope, chimney location, and drainage pattern.
The Metal Roofers’ metal roof trim and flashing guide explains that every piece of trim exists to solve a specific junction, and that roof leaks commonly occur where the panel stops, turns, meets a wall, reaches a valley, or is interrupted by chimneys and other penetrations.
If the side flashing is wrong, the roof may leak only under certain rain angles. Water may ride along the edge of a rib, tuck under a loose lap, or enter at a corner where the side flashing, apron, and counterflashing meet.
Reusing old shingle flashing on a new metal roof is a common problem on retrofit projects, because shingle step flashing is designed for overlapping shingles rather than metal panels.
A chimney that did not leak with asphalt shingles may leak after a metal roof is installed if the old flashing was reused, modified poorly, or not rebuilt for the new roof system. Shingle step flashing is designed to work with overlapping shingles. Metal panels require different continuity, movement tolerance, fastening strategy, and water flow control.
Building America guidance notes that flashing must be integrated with the roof and wall drainage planes, and that flashing at roof-wall intersections should be installed as part of the water-control system rather than treated as a decorative add-on.
For homeowners, the timing is the clue. If the leak started after roof replacement, chimney work, new siding, storm repairs, solar work, or any project that disturbed the chimney base, the flashing should be inspected closely.
If the metal roof itself is also aging, incorrectly fastened, or installed over questionable decking, a broader metal roof replacement evaluation may be needed. But if the panels are sound and the leak is isolated to the chimney, a targeted repair may be enough.
Sealant has a place in roofing, but it should not be the primary water-control strategy around a chimney.
A proper flashing detail uses metal shape, slope, laps, hems, counterflashing, underlayment, and compatible materials to shed water. Sealant helps at specific joints, terminations, and penetrations. It should not be asked to hold back ponding water, replace a missing back pan, cover a bad lap, or compensate for counterflashing that was never tied into the masonry.
Building Science Corporation explains that drainage removes the greatest volume of water in the shortest time, and that interruptions in the drainage plane need flashing to direct water outward. It also warns against relying on sealant-only joints as the primary rain-control measure.
This is why a chimney may “stop leaking” after caulk is applied, then leak again months later. The caulk did not fix the drainage defect. It only bought time.
Chimneys are masonry structures. Metal roofs are metal assemblies. Brick, mortar, steel, aluminum, copper, zinc, and painted steel do not expand and contract at the same rate.
The Brick Industry Association explains that building materials move with temperature and moisture changes, and that restrained movement can create stresses and cracks. It also notes that different materials expand and contract at different rates, which matters where other building elements are attached to brick masonry.
Metal roofing also moves. The Metal Roofers explain that temperature-driven expansion and contraction must be managed in metal roof design, especially in standing seam systems where clips allow panels to move.
At the chimney, this movement can open gaps in sealant, pull flashing loose, stress fasteners, or crack mortar around a reglet. A repair that ignores movement may look good on installation day but fail after repeated heat and cold cycles.
The masonry itself can leak rather than the flashing, because cracked mortar joints, deteriorated crowns, and missing caps let water into a brick chimney. Not every leak near a chimney is a flashing leak.
Brick chimneys can absorb, hold, and transmit moisture through cracked mortar joints, open head joints, deteriorated crowns, missing caps, bad flue covers, or porous repairs. The Brick Industry Association notes that significant water passage directly through brick units is generally unlikely under normal exposure; water penetration more often occurs through the bond line between brick and mortar, mortar joints, cracks, or workmanship defects.
Poor mortar joints matter. BIA construction guidance states that improper mortar joints can result in leaky walls and contribute to cracking, disintegration, and reduced performance.
This is why a roofer should not simply blame the roof covering. A leak near the chimney can come from the flashing, the masonry, the crown, the cap, the flue, the roof deck, the underlayment, nearby penetrations, or a combination of several issues.
The Chimney Safety Institute of America points homeowners to annual chimney inspection practices based on NFPA 211, which includes checking accessible chimney, fireplace, and vent components. It also notes that a basic chimney inspection includes visible portions of the chimney exterior and related components.
A good roof leak diagnosis separates roof flashing failure from chimney masonry failure before recommending a repair.
Metal compatibility matters. Dissimilar metals can corrode when water connects them electrically. That risk increases around chimneys because water runoff, mortar alkalinity, soot, salts, and long wetting cycles can create aggressive conditions.
BIA flashing guidance emphasizes that flashing materials must be waterproof, durable, compatible with adjacent materials, and corrosion-resistant. It also warns about dissimilar metal contact and corrosion resistance when selecting flashing materials.
The Metal Roofers discuss galvanic corrosion on their copper roofing and custom copper flashing page, explaining that copper runoff or contact can accelerate corrosion in less noble metals unless compatible transition materials, diverters, or isolation methods are used.
This is especially important when a chimney has copper counterflashing, painted steel panels, aluminum components, galvanized fasteners, stainless fasteners, or mixed-metal repairs from different decades.
A chimney flashing repair should not only stop water. It should use materials that can live together for decades.
A chimney flashing leak usually begins at the roof-to-chimney joint. A masonry leak usually begins above that joint, in the chimney body, crown, cap, mortar, or flue system.
If the attic staining begins at the roof deck where the chimney exits the roof, flashing is a strong suspect. If water appears inside the firebox, runs down the inside of the chimney, or shows heavy staining above the roofline before it reaches the roof deck, masonry or chimney cap issues may be involved.
If the leak happens mostly during wind-driven rain, suspect side flashing, counterflashing, cracked mortar, or open masonry joints. If the leak happens during nearly every rain and appears at the uphill side of the chimney, suspect the back pan, saddle, cricket, or debris damming. If the leak follows a long soaking rain after leaves collect behind the chimney, the uphill flashing detail may not be draining properly.
Still, these are clues, not final proof. Water can travel in unexpected ways, and multiple defects can exist at the same chimney. A deteriorated mortar joint can let water behind counterflashing. A bad counterflashing detail can soak masonry. A missing cricket can cause ponding that overwhelms a weak side lap. A roof panel fastener above the chimney can leak and make the chimney look guilty.
The safest conclusion is this:
If the leak is near a chimney, inspect the chimney, the flashing, the roof panels, the underlayment, and the attic together. Looking at only one layer often produces the wrong repair.
That whole-system thinking is why The Metal Roofers’ metal roof inspection includes flashings, penetrations, attic conditions, gutters, ventilation, and moisture pathways rather than only the visible roof surface.
Homeowners can check chimney flashing from the ground for metal that looks lifted, bent, rusted, or heavily caulked, plus dark streaks and missing mortar. Do not climb onto a metal roof to check chimney flashing. Metal roofs can be slick, especially with dew, pollen, dust, moss, rain, frost, or steep pitch. Walking in the wrong place can also damage panels, ribs, seams, coatings, fasteners, and trim.
From the ground, you can still gather useful clues.
Look for metal flashing that appears lifted, bent, rusted, wavy, separated, or heavily caulked. Look for dark streaks below the chimney, rust stains, missing mortar, cracked sealant, debris packed behind the chimney, loose chimney caps, missing spark arrestors, cracked crowns, or brick faces that stay wet long after rain.
Inside the home, take photos of stains and mark the date. Note whether the stain grows after hard rain, wind-driven rain, snow melt, or long steady rain. In the attic, look for staining at the chimney corners, wet insulation, damp framing, rusty nails or screws, and daylight near the chimney opening.
This evidence helps a roofer isolate the leak. It also prevents the common mistake of repairing the visible stain while ignoring the roof-side entry point.
A proper chimney flashing inspection starts with water path, not guesswork.
The roofer should first identify the roof slope above the chimney and determine how water reaches the chimney. Is the chimney in a valley? Is it below a large roof plane? Does water from an upper roof dump into it? Are gutters overflowing nearby? Is there a dormer, ridge, solar mount, plumbing vent, or pipe boot above it that could be the real source?
Then the roofer should inspect the visible flashing assembly. The front apron should shed water cleanly. The side flashing should integrate with the panel profile. The uphill flashing should divert water around the chimney. Counterflashing should overlap correctly and be tied into the chimney in a durable way. Sealant should be intact but not acting as the only barrier.
IBHS guidance for steep-slope flashings emphasizes corrosion-resistant materials, proper installation, counterflashing, and manufacturer-code compliance for metal roof panels.
The roofer should also inspect the masonry. Mortar joints, chimney crown, cap, flue termination, cracked brick, and prior repairs can all mimic flashing leaks. BIA guidance makes clear that workmanship at mortar joints, flashing, and penetrations is central to water resistance in brick masonry.
Finally, the roofer should inspect the attic side where accessible. The attic often reveals whether water is entering at the roof deck, from above the chimney, from condensation, or from a separate penetration.
A chimney leak comes back when the repair treats the symptom instead of the water path.
The most common failed repair is surface caulk. The second most common is replacing only the visible apron while leaving bad side flashing or counterflashing in place. The third is installing new flashing without fixing rotten decking, backwards laps, bad underlayment, masonry cracks, or incompatible metals.
A proper repair has to restore continuity. The visible metal flashing must connect to the hidden water-control layers. The counterflashing must protect the top edge. The laps must shed water in the correct direction. The material must be compatible. The chimney must be sound enough to hold the detail. The panel system must still move as designed.
Building America’s common flashing guidance says flashing is needed wherever the drainage plane is terminated or interrupted, and that flashing must direct water outward rather than back into the assembly.
This is also why the cheapest chimney flashing repair is often not the cheapest long-term repair. A low-cost caulk patch can lead to hidden decking rot, wet insulation, mold growth, drywall damage, masonry deterioration, and repeated service calls.
A proper repair begins with diagnosis. The roofer should determine whether the leak is from the roof flashing, chimney masonry, chimney cap, roof panel system, nearby penetration, or a combination of issues.
If the flashing is the problem, the repair may require removing or loosening trim, panels, counterflashing, or damaged sealant around the chimney. Any rotten decking or saturated underlayment should be addressed before new flashing is installed. New underlayment or self-adhered membrane may be needed depending on roof design, slope, code, manufacturer guidance, and existing conditions.
The new flashing should be fabricated for the roof system. On a metal roof, that means the flashing must respect the panel profile, seam type, drainage path, and movement of the metal. The uphill side needs a back pan, saddle, or cricket detail that moves water around the chimney. The side flashing needs to prevent wind-driven rain from entering at the panel ribs or side laps. The apron needs to discharge water onto the roof surface below. The counterflashing needs to protect the top edge of the base flashing and tie into the masonry in a durable way.
IBHS notes that flashing and counterflashing for metal roof shingles or panels should be installed in compliance with local code and panel manufacturer instructions.
If the chimney uses copper flashing or copper counterflashing, compatibility matters. The Metal Roofers’ copper roofing and custom copper flashing page discusses copper roofing, soldered joints, patina, and the importance of managing galvanic corrosion where copper interacts with less noble metals.
For homeowners comparing repair scope and budget, The Metal Roofers’ metal roof cost guide explains that custom flashing work at valleys, dormers, chimney saddles, and wall transitions affects metal roof pricing because those details are more complex than open field panels.
A chimney flashing leak can often be repaired without replacing the entire roof when the panels are in good condition, the decking around the chimney is solid, the leak is isolated, and the existing roof system can be properly integrated with new flashing.
This is common when the roof is relatively new but the chimney flashing was poorly detailed. It can also happen when old sealant fails, counterflashing pulls loose, mortar joints open, or storm debris damages the uphill side of the chimney.
A targeted repair may include new counterflashing, new apron flashing, corrected side flashing, a better uphill saddle detail, repaired underlayment, compatible sealant at proper terminations, and masonry repair where needed.
The key phrase is properly integrated. A new piece of metal slapped over an old leak path is not the same as a flashing repair.
A larger repair may be needed when the chimney leak is only one symptom of a broader roof-system problem.
That may include rotten decking around the chimney, repeated leaks at multiple penetrations, poorly installed panels, extensive fastener wear, bad roof-to-wall transitions, incorrect panel termination, incompatible materials, or a roof that was installed without proper underlayment and flashing integration.
The Metal Roofers’ metal roof replacement page explains how metal roof systems must be designed for movement, fastening, panel type, substrate, and long-term water control. That matters when the problem is not just one flashing defect but the way the roof was assembled.
If the leak followed hail, wind, falling limbs, or storm damage, homeowners may also need documentation for a claim. The Metal Roofers’ insurance process page explains how storm-related roof replacement claims can be handled and how homeowners may use an approved claim to upgrade to metal roofing.
The caulk test is not a real diagnosis, because caulk can block the most visible opening while water keeps entering somewhere else. Many homeowners try to test a chimney leak by caulking the visible crack. If the leak stops, they assume the crack was the cause.
That conclusion may be wrong.
Caulk can temporarily block the most visible opening while water continues entering somewhere else. It can also trap moisture behind flashing or masonry. In some cases, caulk diverts water to another weak point, making the next leak appear in a different place.
A better test is a controlled inspection of the entire water path. Where does water hit the chimney? Where does it drain? Where is the counterflashing terminated? Are the laps facing the right direction? Is the uphill side ponding? Are panel ribs creating channels? Is the masonry cracked? Is the attic stain at the roof deck or higher on the chimney? Are other penetrations above the chimney?
Building Science Corporation’s rain-control guidance emphasizes drainage and drying because water will eventually find weak points when assemblies rely on perfect surface sealing.
If caulk is the only thing keeping a chimney dry, the flashing has already stopped doing its job.
A chimney leak can look like a roof leak when the real source is a cracked crown, missing cap, deteriorated mortar, or damaged chase cover. Some water problems near chimneys are not caused by roof flashing.
A cracked chimney crown can let water enter from the top. A missing chimney cap can allow rain into the flue. Deteriorated mortar can admit wind-driven rain. Brick spalling can indicate trapped moisture. A damaged chase cover on a framed chimney can leak like a roof defect. Condensation inside a flue can mimic rainwater. A gutter overflow can send water back toward the chimney chase. A pipe boot above the chimney can leak and travel downhill.
BIA explains that water penetration in brick masonry often occurs through mortar joints, separations between brick and mortar, cracks, and workmanship defects rather than through the brick body itself.
CSIA homeowner guidance also points to annual chimney inspection practices, which help identify chimney-side issues that roofers alone may not fully evaluate.
If the leak appears inside the fireplace, around the damper, in the firebox, or down the flue rather than at the ceiling or roof deck, the chimney system itself should be inspected.
Middle Tennessee roofs see heavy rain, wind-driven storms, humidity, temperature swings, and storm debris. Those conditions are tough on chimney flashing because the assembly is exposed to water, sun, heat, cold, expansion, contraction, and organic debris.
Older homes can have another issue: the chimney may have been flashed for a previous asphalt roof, repaired by multiple contractors, patched with different materials, or modified during a roof replacement. The visible chimney may look solid from the ground while the hidden flashing and underlayment are no longer reliable.
The Metal Roofers serve Nashville and Middle Tennessee with metal roofing services that include standing seam, metal shingles, classic panel, copper, zinc, roof coatings, inspections, repairs, and replacements. Their repair page specifically notes that older Nashville chimneys can be vulnerable when original flashing details were designed for shingles rather than metal roofing.
For homeowners outside Nashville proper, the areas we service page is the best place to confirm local availability.
Yes, indirectly.
Gutters do not usually cause a chimney flashing leak by themselves, but drainage problems can increase the amount of water near vulnerable roof edges, valleys, walls, and transitions. If gutters are clogged, undersized, loose, or dumping water near a roof-wall area, water may back up, overflow, or saturate adjacent building components.
Near a chimney, debris is often the bigger issue. Leaves and pine needles can collect behind the chimney, especially on the uphill side. If water is slowed or trapped there, the flashing has to resist longer wetting periods.
If gutter overflow, fascia staining, or roof-edge drainage is part of the problem, a roofer may also inspect the metal gutter system and nearby drip edge. The Metal Roofers’ repair page notes that drip edge and perimeter trim issues can create water problems that look like fascia or gutter issues.
Yes. A small flashing defect may not leak during a light rain because water drains past it too quickly. During heavy rain, water volume increases. During wind-driven rain, water direction changes. During long rain, materials stay wet longer. During storms with debris, the uphill side can clog and pond.
That is why “it only leaks sometimes” does not mean the problem is minor. It may mean the flashing fails only under the conditions it was supposed to handle.
Building Science Corporation’s rain-control framework is useful here: roofs and walls must manage rain by deflection, drainage, storage, and drying. When drainage is interrupted at a chimney, small defects become more important.
Yes. Water can enter at the chimney and travel along roof decking, rafters, insulation, drywall seams, electrical penetrations, or framing before appearing indoors.
This is why the stain location is evidence, not proof. A ceiling stain downhill from the chimney may be a chimney leak. A stain beside the chimney may be a side flashing leak. A stain far below the chimney may still be related if the roof slope and framing create a path.
A professional inspection should trace the leak from the inside out and from the roof surface down. The Metal Roofers’ metal roof inspection process is built around that kind of system-level review, including attic conditions and moisture pathways.
Copper can be an excellent flashing material in the right application, especially on premium roofs, historic homes, masonry chimneys, and architectural details. It is durable, formable, and often used for custom counterflashing, chimney caps, valleys, dormers, and accent roofing.
But copper is not automatically correct for every metal roof. It must be used with attention to compatibility, runoff, fasteners, soldered or locked seams, adjacent metals, and isolation from materials that may corrode.
The Metal Roofers’ copper roofing page discusses copper applications including chimney caps, dormers, valleys, counterflashings, soldered joints, and compatibility concerns such as galvanic corrosion.
A good roofer chooses chimney flashing material based on the roof system, chimney masonry, surrounding metals, expected movement, exposure, budget, and long-term durability.
For most homeowners, no.
No, chimney flashing repair is not a do-it-yourself job for most homeowners. A small sealant touch-up may look simple, but chimney flashing repair is not just applying caulk. It may involve roof panels, masonry joints, counterflashing, underlayment, panel movement, fastener placement, compatible metals, attic diagnosis, and safe roof access.
Metal roofs also add risk. Walking incorrectly on panels can damage seams or coatings. Fastening into the wrong location can create new leaks. Cutting or modifying flashing without understanding the water path can make the leak worse.
A homeowner can document symptoms, photograph visible issues from the ground, check the attic if safe, and note when the leak occurs. The actual repair should usually be handled by a qualified roofing professional, especially on steep roofs, standing seam roofs, copper details, tall chimneys, or active leaks.
Call quickly if water is actively dripping, drywall is soft, insulation is wet, the stain is spreading, you smell mold, the chimney flashing is visibly loose, ceiling paint is bubbling, there is electrical wiring near the leak, or the chimney masonry appears unstable.
You should also call after wind, hail, or falling debris if the leak appeared suddenly. Storms can lift flashing, bend panels, crack sealant, loosen counterflashing, damage masonry, or send branches into the uphill side of the chimney.
For active leaks in the Nashville area, start with metal roof repair in Nashville. For uncertainty, start with a metal roof inspection. If the roof is older or the leak is one of several issues, review the metal roof replacement page to understand when a repair may no longer be enough.
You may have a chimney flashing leak if water stains appear near the chimney, below the chimney on the roof slope, beside a fireplace wall, or in the attic at the chimney opening. Other clues include loose flashing, cracked caulk, heavy sealant around the chimney base, debris behind the chimney, staining on roof decking, or leaks that worsen during wind-driven rain.
A professional should verify the source because masonry leaks, chimney cap leaks, pipe boot leaks, valley leaks, condensation, and roof panel issues can look similar.
Yes. A new roof can leak at the chimney if the flashing was reused, incorrectly adapted from an old shingle roof, poorly integrated with the metal panels, or not tied into the masonry correctly. Metal roofs require flashing details that account for panel profile, drainage, fastener placement, and thermal movement.
Often, yes. If the roof panels and decking are in good condition and the leak is isolated to the chimney, a roofer may be able to remove or loosen the necessary surrounding components, rebuild the flashing system, and integrate new counterflashing without replacing the entire roof.
If the roof has widespread installation defects, rotten decking, multiple leaks, or major panel problems, a larger repair or replacement may be recommended.
Wind-driven rain can push water into gaps that do not leak during straight-down rainfall. Side flashing, counterflashing, cracked mortar joints, and open reglet details are common suspects when leaks happen only during storms from a certain direction. Building Science Corporation identifies wind-driven rain as a major moisture load that roof and wall assemblies must manage.
Usually not. Caulk may be part of a proper flashing detail, but it should not be the primary defense against water. If sealant is being used to replace missing flashing, cover bad laps, seal loose counterflashing, or hold back ponding water, the repair is likely temporary.
Base flashing is the roof-side flashing that directs water away from the chimney. Counterflashing is the upper flashing that covers the top edge of the base flashing and ties into the chimney masonry. Counterflashing helps stop water from running behind the roof-side flashing. IBHS guidance describes counterflashing requirements and reglet-style installations for masonry conditions.
Repeated leaks usually mean the repair did not fix the water path. Common reasons include surface caulk instead of rebuilt flashing, no proper uphill saddle or back pan, loose counterflashing, masonry cracks, incompatible metals, bad underlayment laps, trapped debris, or movement between the chimney and roof system.
It depends on the source. If water is entering at the roof-to-chimney joint, a roofer experienced with metal roof flashing is usually needed. If water is entering through the crown, cap, mortar joints, flue, or chimney body, a chimney professional may also be needed. Many chimney leaks require both perspectives.
A chimney flashing leak is not just a roof leak near a chimney. It is a failure in the transition between two different systems: the sloped roof and the vertical chimney.
The leak may come from loose counterflashing, a missing back pan, wrong side flashing, old shingle flashing reused on a metal roof, cracked masonry, incompatible metals, poor underlayment laps, or sealant that was asked to do the job of properly formed metal.
The right repair starts with the water path.
Find where the water enters, prove how it travels, then rebuild the flashing so water moves down and out, not behind the chimney, not under the panels, and not into the house.
For homeowners in Nashville and Middle Tennessee, The Metal Roofers can inspect the roof, trace the moisture path, and determine whether the chimney needs a targeted flashing repair, masonry coordination, panel work, or a larger roof-system correction. Start with a metal roof inspection, review metal roof repair in Nashville, or explore the metal roof trim and flashing guide to understand why chimney flashing details matter so much.

Considering a standing seam metal roof? Learn about its durability, benefits, and why it's a top choice for homeowners.